Domain Kiosk
Creative website design and internet marketing studio
How to run a healthy HYDRA staking node
This article is all about the health of your HYDRA staking node, and the important things you need to know to win block rewards on the HYDRA blockchain.
If you just found out about HYDRA, here is the website of the project >> Hydrachain.org
What are you going to learn in this article?
- Choosing the staking wallet for your node;
- Installation and starting the staking wallet;
- Synchronizing the wallet with the blockchain;
- Enabling staking and unlocking for staking only
- Monitoring the wallet status;
- Stopping the wallet;
- The probability game and when to expect to win a block reward;
- Optimizing UTXOs;
- The importance of time synchronizing the node;
- Checking if node time is synchronized properly;
- Mini-forks and how to avoid them;
- Orphan blocks and how to reduce the chances of getting one;
- Hardware problems and resources shortage.
- Things to avoid when running a HYDRA staking wallet;
- Short Guide to confirm your wallet is set up properly for staking.
1. Choosing the staking wallet for your node
First things first.. you need to decide which staking wallet is right for you. There is a Daemon staking wallet (hydrad), which is managed in command line using the Hydra client (hydra-cli), or a Desktop staking wallet with Graphic User Interface (hydra-qt). The latest binary releases and the source code can be found on Github here >> Hydra Node Releases.
The Daemon wallet is for experienced users only. So we will not focus on it here. The Desktop (GUI) wallet is good to begin with and learn the ropes of staking HYDRA. The GUI wallet is also excellent for experienced users, it uses the same core code as the Daemon wallet but also has a very intuitive and useful Graphic interface for management and monitoring the Node.
Both staking wallets may be used on Windows, Linux, MacOS and even on Raspberry Pi OS. The staking wallets look the same and work the same way on the different Operating Systems, only the location of the data folder is different, and of course you need to download from Github the release file of the wallet corresponding to the OS you prefer.
2. Installation and starting the staking wallet
Different ways to install the wallet exist. Simplest is to create a new folder HYDRA and copy the zip file from the release. Then unarchive the zip file. In the bin subfolder you will find the executable files hydta-qt, hydrad and hydra-cli. Hydra-qt is the wallet with GUI. You cannot run at the same time the GUI wallet and the command line wallet. For some releases exist also an .exe version of the wallet, which is an auto installer. You can download and run the .exe file, it will install the wallet.
Detailed instructions how to install the Staking wallet for different Operating Systems can be found here >> Hydrachain.org/becoming-a-node
When you start the wallet a window will pop up suggesting a location for the wallet data directory. Choose the default or create your own, however you should take note where the directory will be. Later you can copy the whole directory to make a backup copy of the downloaded blockchain or check out the debug.log file, but for this you need to know where to find the data directory.
√ On the Raspberry Pi you will find the wallet data directory here: /home/pi/.hydra . It can be set "invisible", right-click with the mouse when inside the upper directory and make hidden directories "visible" to be able to see it.
√ On Linux: ~/.hydra
√ On MacOS: ~/Library/Application Support/hydra
√ On Windows: C:\Users\Administrator\AppData\Roaming\HYDRA
In this directory you will also find the wallet.dat file, which holds in encrypted format your private key(s). Please note this file will be in encrypted format only if you "ENCRYPT" the wallet first. The first thing that you should do after you start the wallet is ENCRYPT it with a very strong password and make a backup of the wallet.dat file (i.e. on a flash drive, NOT in the cloud and NOT on your everyday computer).
The wallet is starting ⇓ 
Encrypting the wallet ⇓

Encrypt the wallet with a strong password. This is the most inner layer of your wallet security defense. Keep the copy of the encrypted wallet.dat file in a secure location, inside are your private keys.
3. Synchronizing the wallet with the blockchain
When the wallet is started for the first time it automatically begins downloading the blockchain (blockchain syncing). Your wallet is not ENCRYPTED yet, and also you may need to import an address with its private key you would want to use (by default the wallet will create a wallet.dat file with a random address/private key pair).
The wallet syncing with the blockchain ⇓ 
To speed up things and avoid re-syncing, you can stop the process of blockchain syncing at this early point and ENCRYPT the wallet, also import a private key in the wallet CONSOLE with the command:
importprivkey "your-hydra-private-key"
To stop the blockchain syncing press the status icon ![]() in the top right corner of the wallet. ⇓
in the top right corner of the wallet. ⇓ 
Then you can ENCRYPT the wallet, import a private key, and make a BACKUP. To import a private key the wallet needs to be UNLOCKED for sending with the same password or pass phrase you used to encrypt it. After you import a private key the wallet will want to re-sync, so let it do its job and wait until it is fully synced. This can take a few hours, the process is slow at first but speeds up as it progresses.
The wallet Console, where you can import a private key. To get there: HELP > INFORMATION WINDOW > CONSOLE ⇓ 
4. Enabling staking and unlocking for staking only
To enable staking go to the Staking tab and press the switch button to the right ⇓ 
When you push the button to the right, a window will open to enter your password. Enter your password or pass phrase to unlock for staking only ⇓

To recap: the wallet is staking when these two conditions are true:
√ Staking is enabled;
√ Wallet is unlocked for staking.
5. Monitoring the wallet status
Hover with the mouse over the icons in the top right corner of the wallet to monitor the status. A pop-up window will show more info on each icon.
Wallet is encrypted and locked. ⇓

You need to unlock for staking only. When the switch button to enable staking is pushed to the right a window will open to let you unlock the wallet.
The HYDRA balance is zero, so no coins to stake, not staking ⇓

The wallet is unlocked for staking only and staking is enabled ⇓

The node has acquired 8 outbound connections with other nodes ⇓

The node has more than 8 connections, 8 outbound and the rest - inbound. The icon is black ⇓

Outbound are connections when your node reaches out to connect to other nodes. 8 outbound connections are the first the node gets. After that, when port 3338 is open and properly forwarded, the wallet will get more than 8 connections. These are inbound connections when other nodes found your node and reached out to it to connect. The inbound connections build slowly, a few new per day.
8 connections are sufficient to stake, more than 8 connections are better, they help reduce the likelihood to get into mini-forks and reduce the chances for getting an orphan block. Later in this article mini-forks and orphan blocks are explained.
The node is fully synced with the blockchain ⇓

6. Stopping the wallet
The wallet is stopped and the app is exited by clicking the X in the top right of the window. When you press the X a shut down procedure is started and no data is lost or corrupted. If you need to reboot or turn off your node, it is recommended first to stop and exit the wallet by pressing the X. ⇓

Sometimes you may want to stop syncing the wallet with the blockchain without exiting the wallet. This can be done by clicking the ![]() icon. ⇓
icon. ⇓

This is especially useful when you first launch the wallet. It will immediately start downloading the blockchain. In case you want to encrypt the wallet, or to import a private key, you would want to first stop syncing. After you encrypt the wallet or import a private key, the wallet will re-sync from the very beginning with the blockchain, and the time to sync the entire blockchain (or a big chunk of it) before encrypting the wallet or importing a private key won't be wasted.
7. The probability game and when to expect to win a block reward
You intuitively know how probability works for dice. Probability lets us make calculations about random events like rolling dice (or HYDRA block rewards). We will start considering a die (a single dice) and define success as rolling a “1”. You expect to get a “1” every 6 rolls (“Expected Time” = 6), but also you know you are not guaranteed to get a “1” every 6 rolls because this is a random process.
The probability of an event occurring is given on a scale of 0 (will never happen) to 1.0 (definitely going to happen). The probability of getting a “1” in a single roll of the die is 1/6 or 0.167.
We can use this same approach to calculate the probability of winning a HYDRA block reward for the next block. To make the math easier, let’s consider a wallet with 1000 HYDRA, and a Network Weight of 2,000,000. The wallet software makes the probability of winning a block reward 1,000 / 2,000,000 = 0.0005 = 1⁄2000. What does this mean, compared to the die?
| Die | HYDRA | |
| Probability of success | 0.167 | 0.0005 |
| Expected time | 6 rolls | 2000 blocks |
Here we see the probability of success for a single trial, getting a “1” in a single roll of the die, or a block reward on the next block, and the Expected Time to the successful result.
This “Expected Time” is the same answer given by the HYDRA wallet for a given wallet weight and network weight, which the wallet calculates based on the difficulty of minting a new block. For our example, the expected time is 2,000 blocks or about 71 hours (2.9 days). In other words the "Expected Time" is another way to express the probability of the event of winning a block reward.
Rolling the die or trying for a HYDRA block reward are called “Independent Trails” in probability, which means each roll of the die or HYDRA block reward is a new probability event with an identical chance of success. The previous results have no influence on the results for independent trials. Contrast this, for example, with double-deck Blackjack, and if you can count cards this is not a game with independent trials.
Let’s look at “Expected Time” more, with a brain teaser. The Expected Time is 2000 blocks (about 2.9 days). After half the Expected Time has elapsed from the last block reward, what is the Expected Time to the next block reward?
Answer: the Expected Time is still 2.9 days!
This has to be true because of independent trials. The "kernel" hash random number generator lives in the moment, has no history, and can only tell who wins the next block reward. “Independent Trials” means each new block reward, like each roll of the die, is independent of any previous results.
To get a more useful answer for “when block reward?” let’s look at this chart representing Expected time vs Probability to win a block reward ⇓
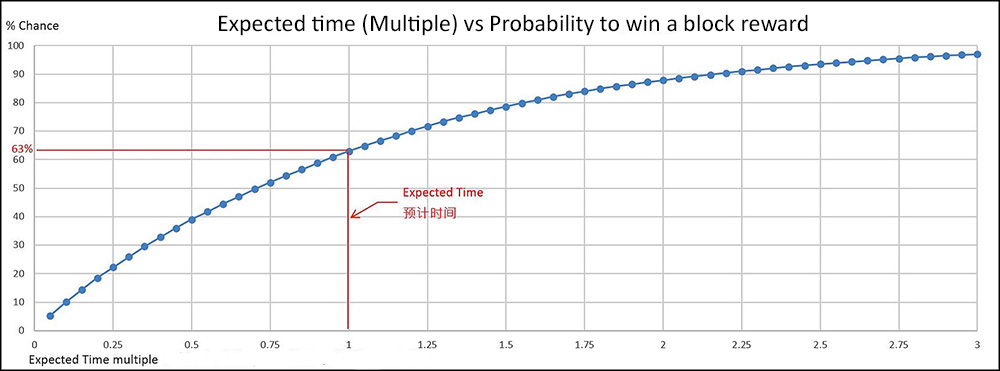
How to read this chart? The horizontal axis gives the multiple of Expected Time. The vertical axis gives the percent chance of a block reward. The red lines show that there is a 63% chance of receiving a block reward at the Expected Time. This means after your wallet receives 100 block rewards, about 63 of them will have arrived before the Expected Time. Some block rewards however would arrive much later than the Expected Time, and blocks arriving 5~9x the Expected Time are still possible.
8. Optimizing UTXOs
One possible optimization of your wallet is to optimize the number and size of UTXOs in your wallet.
UTXOs are like bills in the wallet. Imagine you have one 10$ bill and one 5$ bill (two UTXOs), and you want to spend 3$. Then one of the bills (UTXOs) in the wallet will be spent and you will receive a change. The wallet will determine automatically which UTXO to use, but you can also manually point which UTXO should be used to spend. For this to be possible you need to enable Coin Control features option here: SETTINGS > OPTIONS > WALLET ⇓

When the wallet is staking, for each block a "kernel" hash is calculated. The "difficulty" of the blockchain is weighted for each UXTO and compared to the "kernel" hash.
If
"kernel" hash < "difficulty" x UTXOvalue
then the wallet announces a "mined" block and the winning UXTO (together with the block reward) has to mature again for 500 blocks (approx. 17 hours). The rest of the balance remains available for staking. Obviously if you have all the HYDRAs in one UTXO, if it wins a block it will not be staking until mature again. So It makes sense to split larger UXTOs into smaller ones.
The wallet will split automatically (free of fees) UTXOs larger than 200 HYDRAs and will merge UXTOs smaller than 100 when a new block is won. But you can speed up the process, by manually selecting bigger UTXOs (like 1000 HYDTA or more) and sending part of each UTXO back to yourself. You will receive what you sent plus the rest as "change" (minus the fee for the transaction) and next time you win a block only part of your balance (the winning UTXO + reward) will have to mature again.
9. The importance of time synchronizing the node
The wallet (when staking) calculates the "kernel" hash every block. Then the hash is compared to the weighted "difficulty". If the "kernel" hash is less than the weighted "difficulty", then the wallet announces to its peers a new block with the winning reward. The peers check the validity of the "kernel" hash and can accept it (and "gossip" to their peers) or reject it.
The formula for calculation of the "kernel" hash uses several inputs, that are essential for the randomness of the calculated hash. One of these inputs is the time stamp (in UTC time) of the newly created and announced block. Obviously if the peers do not find the new block to be valid (for many reasons, including the time stamp being "in the past" or "in the future") they will reject it and the wallet will automatically remove the reward from its local copy of the blockchain.
10. Checking if node time is synchronized properly
There are several ways to check if the system clock of the node is in sync with UTC time. Simplest way is to compare to the clock of your smartphone or laptop. The clock on the node and any other device you have should tick in perfect sync to the second. If not, then one of the devices or may be more of them are not synced with UTC time.
What is UTC time (i.e. Coordinated Universal Time)? UTC is provided by selected reference atomic clocks for all devices on the internet to synchronize time. Here is a good brief article explaining UTC > https://www.timeanddate.com/time/aboututc.html .
You can compare your node system time with any of the websites displaying UTC, like time.is or timeanddate.com .
The staking wallet can show the time offsets with other connected peers. Here you find the screen below: HELP > INFORMATION WINDOW > PEERS

These offsets can be used as indication whether your system clock is running in sync, for example if you see most of your peers offsets like + 3~5 seconds, or like - 2~4 seconds, then this can indicate your clock is not properly time synced. Bear in mind this is just an indication, you node should be synced with UTC time. So in case you observe majority of your peers at 0 and some at +⁄- 1~2 sec offset, you should do nothing. However in case you observe most of your peers with larger offset, then stop/exit the wallet, re-sync your system clock with UTC, and run the wallet again.
How to set up system clock synchronize automatically?
First set properly your time zone. If your node is at home, the time zone should be the same as your local time zone. In case your node is an instance on AWS, then the time zone of the instance should be the same as the location of the instance.
Second set your system clock to sync automatically with internet atomic time (UTC).
For Windows go to the screen below and check when last time the system clock was auto-synced.

Then press a few times the "Update Now" button. If necessary change the time server and press the "Update Now" button a few times again (until you see no error displayed).
√ Here is an article with detailed step by step instructions for Windows > https://mashtips.com/fix-time-not-updating-syncing-windows10/
√ For Linux you can check out this article > https://vitux.com/debian-ntp-time-sync/
√ For MacOS > https://www.macinstruct.com/tutorials/synchronize-your-macs-clock-with-a-time-server/
√ The latest RaspberryPi OS (Buster) for Raspberry Pi auto-syncs time by default once every 34 minutes. In earlier versions of the OS (like Wheezy, Stertch or early Buster) the system time was synced just once at booting the system. Then it was useful to use a cron job to resync time every 24 hours. I still keep this cron job on the Pi I run as a staking node, just to be sure time is always synced, even if the devs of the RaspberryPi OS change again something in the future with an update. Check it here > https://www.thedomainkiosk.com/trends/how-to-protect-the-ssh-session-with-2fa-on-raspberry-pi-3b-plus.html
In case the articles above are not helping, then search google for how to sync your system clock on your specific Operating System.
11. Mini-forks and how to avoid and resolve them
Mini-forks can happen for different reasons. Most often they occur when the system clock of the node is not properly synced with UTC. When your wallet is not displaying correctly the balance (the balance is different from the balance you can see on explorer.hydrachain.org), first thing that should be checked is a problem with system time synchronization.
To quickly solve a mini-fork do the following: 1.Stop the wallet; 2.Re-sync time; 3.Reboot the OS; 4.Start the wallet; 5.Re-index the wallet.
Here is how to re-index the wallet. Go to SETTINGS > OPTIONS > MAIN ⇓

12. Orphan blocks and how to reduce the chance of getting one
Orphan blocks can happen, even if time sync is on track. They happen when two different wallets purely by coincidence find the same winning block. Orphan blocks are more frequent when the total number of nodes on the network is growing larger. Here is a good article where you can learn in detail about orphan blocks > https://jb395official.medium.com/orphan-blocks-june-16-2018-a8f4799dcc2c
To reduce the chance to get orphan blocks is recommended the following:
√ Improve the reliability and speed of your internet connection;
√ Open/forward properly port 3338 to get more than 8 connections to your node by peers;
√ Run a faster node;
To see if your wallet has mined an orphan block, open the debug.log file and search upwards from the bottom for “conflicts with wallet transaction”. If your wallet has mined an orphan you will find this log line and a log line a few lines later showing “CT_DELETED” which removes the orphan transaction from the table of transactions in the wallet.
13. Hardware problems and resources shortage
We saw already how slower and unreliable internet or slower node in general could influence a bit the staking performance (orphan blocks). But there could be other more serious problems on your running node, like insufficient RAM or insufficient storage space, or even corrupt hardware.
When you experience unexplained and unexpected freezes of the wallet, or the wallet closing by itself, first thing that may cause this is RAM shortage or storage space shortage. This becomes a problem especially when you run the node on a Raspberry Pi, the SD card can ware fast, pile up errors and the useful free space can shrink. Sometimes the Pi needs some extra RAM and if the swap file is not configured to handle this, the Pi will crush. By default the swap file is set to a minimal size on the Pi (100MB), which is certainly not enough when running the wallet and swap is needed.
Here in this guide you can learn more about swap and swappiness > https://peppe8o.com/set-raspberry-pi-swap-memory/
In the following (very old) article you can see how I reconfigure swap file and swappiness on my Pi (read section 10 ) > https://www.thedomainkiosk.com/trends/raspberry-pi-4b-basic-setup-with-raspbian-buster-and-getting-ready-to-install-the-loc-staking-wallet.html
Yet when you reconfigure the swap file to 2GB and swappiness to 10%, still there could be very little space for the swap file to exist on the SD card. You need a new SD card or a SSD for the Pi. I would recommend this article for adding a SSD to the USB3 port of the Pi4 > https://www.tomshardware.com/how-to/boot-raspberry-pi-4-usb
For Windows users here is some useful info > https://www.windowscentral.com/what-swapfilesys-and-do-i-need-it-my-windows-10-pc . Generally it should work by default and Windows will take care of it. For AWS Windows instance users in case you experience unexpected crashes of the wallet, a possible solution is to configure an alternative Windows instance in a different location.
14. Things to avoid when running a HYDRA staking wallet
√ Do not stake on two identical wallets (with same public HYDRA address), this can cause issues with winning blocks. Of course you can have one wallet staking and another as backup. And when you perform sort of maintenance on the main wallet you could stake on the backup wallet (to reduce offline time);
√ Do not reboot without good reason. Stopping the wallet will cause all established connections to be lost and they will have to be built again, when the wallet is started. Of course if you think you tried everything to set up properly the node, and still are in very bad luck zone for winning a block, then a reboot of the system could help. Rebooting is recommended once per month, together with update/upgrade of the OS (for Linux), or in case Windows needs a reboot to complete an update.
√ Do not disconnect peer nodes with some time offset. They may re-sync their time with UTC and be on track again. In case a peer node stays with a considerable offset for a longer time, your node will automatically disconnect from it and temporarily ban it.
√ Do not leave for a very long time your staking node unattended. This is a live server and things can happen, like for example Windows updated and changed somethings on your node, or Computer clock stopped regularly syncing time which lead to a big time drift of your system clock.
15. Short Guide to confirm your wallet is set up properly for staking
√ Wallet updated to the latest version
√ Synced to the latest block
√ Unlocked for staking only
√ Staking is enabled
√ Computer clock set correctly
For additional information
- https://hydrachain.org/
- https://github.com/Hydra-Chain/node
- https://github.com/Hydra-Chain/node/tags
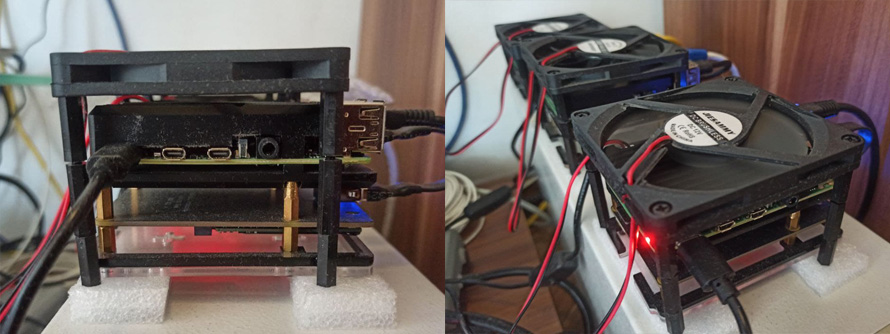
Hardware used in this article
Node on Raspberry Pi4b
- - Raspberry Pi 4b;
- - 5V/3A C-type connector power supply;
- - Samsung 970 EVO Plus 250GB NVMe M.2 SSD;
- - X870 NVMe M.2 SSD Storage Expansion Board (Adapter) - JMicron Technology Corp. chip set;
- - Empty SD card;
- - Armor case/heat sink for Raspberry Pi 4b;
- - 12V low noise Jiesammy cooling fan, powered from the Pi;
If you find inaccuracies in this article or ways to improve it, please leave a comment below.
Related articles
The Guide to staking HYDRA on Raspberry Pi 4b
The Guide to staking LOCs on Raspberry Pi 4b (Pre-Hydra Testnet)
- Raspberry Pi 4b - basic setup with Raspbian Buster and getting ready to install the LOC staking wallet
- Recompiling and installing of LOC staking wallet with GUI on Raspberry Pi 4b
- Basic security check list for staking LOCs on Raspberry Pi 4 model b
- Using Ledger Nano S to protect the SSH session to the Raspberry Pi 4b with LOC staking wallet
The Guide to staking LOCs on Raspberry Pi 3b+ (Pre-Hydra Testnet)
Yours, Crypto Qu
Ways to support my work, if you find it helpful. Thank You!
Book with LockTrip
![]() Save up to 60% on hotel reservations with Locktrip booking engine!
Save up to 60% on hotel reservations with Locktrip booking engine!
Extra 5% discount for first booking with code Y8XVQ
Go to Locktrip ...
 Scan QR code for LOC wallet address to send donation to
 Comments are helping improve the article quality and are of great value for me!
 Scan QR code for HYDRA wallet address to send donation to
 Scan QR code for BTC wallet address to send donation to
Our clients' websites 'live':
www.alcoart-bg.com www.cellular-concrete.net
www.ionitech.com www.nikol-n.bg www.stroitel-bg.com
Newest projects: www.tsninja.com