Domain Kiosk
Creative website design and internet marketing studio
Raspberry Pi 4b - basic setup with Raspbian Buster and getting ready to install the LOC staking wallet
The new Raspberry Pi 4b has arrived! Let's set it up for best performance for staking with the LOC staking wallet!
In this article we will make the very basic setting up of the Raspberry Pi 4b. This is the first of a series of four articles dedicated to using the Raspberry Pi 4b for staking LOCs. Some of the information provided here has already been covered in my previous articles about staking LOCs on the Pi 3b+. However there are many differences between using the Pi 3b+ and the Pi 4b, and, to make things easier to find, I decided to write a whole new article series about staking LOCs on the Pi 4b. The four new articles can be used as A Guide to staking LOCs on Raspberry Pi 4b.
But before we begin, a few words about the choices I made. As before, all my choices were dictated by the two goals I wanted to achieve - security and convenience. At this point an important decision that had to be made was which Raspbian Buster to use - Raspbian Buster lite or Raspbian Buster with desktop. I preferred Raspbian Buster with desktop, because it had the added convenience for me of being able to view the structure of the OS filesystem with the File Manager. Besides that the Pi 4b is quite capable to run the Raspbian with GUI, so choosing the Raspbian Buster with desktop was easy. Also I wanted to run the Pi 4b with the LOC staking wallet "headless" (no monitor and keyboard/mouse attached), and be able to view the Raspbian desktop remotely on my every day computer.
What are the steps to set up the Pi 4b in this article?
- Add a SSD to the Raspberry Pi 4b on the USB-3.0 port and make the Pi boot the OS from the disk.
- Set up "Boot options" (choose Desktop GUI, requiring user to login).
- Set up "Interfacing options" (turn on SSH and VNC).
- Set up "Advanced options" (set Resolution mode 16).
- Set up VNC.
- Customize the desktop.
- Set up fixed IP address.
- Disable WiFi and Bluetooth permanently.
- Disable Audio permanently.
- Set up swap file and swappiness.
- CPU-status script.
- Time-resync and time-status scripts.
- Create cron job for time-resync.
- Spoof MAC address (only if you intend to run the Pi with a public IP address, i.e. not behind NAT).
- Back up Raspbian Buster with current configuration.
- Expand the file system to occupy the whole SSD free space.
- Update and ungrade the Raspbian OS.
1. Add a SSD to the Raspberry Pi 4b on the USB-3.0 port and make the Pi boot the OS from the disk.
The Pi 4b is here and it is packed with new and faster chips. Unfortunately booting the Raspbian OS from a device attached to the USB-3.0 port is still not directly supported, as it was on the Pi 3b+. The Pi foundation is promising an update that would address and fix this. For now we have a nice old fashioned solution to use the SD card as "Bootloader" that would point to boot the OS from a device connected to the USB-3.0 port (USB3-to-SSD adapter + SSD in our application).
Before you begin, there are two things you should not do, until you successfully pass all steps for adding the SSD and testing that the "tandem" of the Bootloader SD card and the Bootable SSD works as expected.
Firstly, do not "sudo update && sudo upgrade", because this will create discrepancy between the kernel pointed in the Bootloader SD card and the actual kernel on the SSD. Weird things will happen and your system will not work.
Secondly, if you are running the Pi "headless" via ssh do not "sudo reboot" or you will not be able to log in remotely after rebooting without manually adding the "ssh" text file on the Bootloader SD card before attempting "reboot".
1.1 Download the "Raspbian Buster with desktop" image from the official Raspberry Pi website.
https://www.raspberrypi.org/downloads/raspbian/
1.2 Prepare Bootloader SD Card – Burn the "Raspbian Buster with desktop" image file using Win32DiskImager and create a text file with file name "ssh" in the boot partition. The next time the Pi is rebooted this file will tell it to turn on the SSH server so you can access the Pi remotely. The "ssh" file can be empty or contain something, also it can have the extension .txt or no extension at all;
1.3. Prepare the SSD – Burn the "Raspbian Buster with desktop" image file on the SSD, as you just did in the previous step on the SD card. Create the text file named “ssh” in the boot partition of the SSD too;
1.4. Boot Raspberry Pi – Start up your Raspberry Pi with only the SD card in the slot. After the Pi finishes booting up plug in your SSD;
1.5. Find the local IP address – Log in your router and find the IP of your Pi on the local network. In most cases this would be a dynamic IP, assigned (leased) to the Pi by your router;
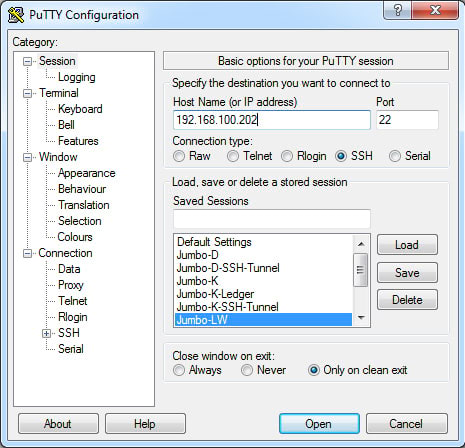
1.6. Open a SSH session and log in with user "pi" and password "raspberry";
Example using Putty on Windows 7 (the remote machine we will access the Pi from). The Pi IP address is 192.168.100.202 and the ssh port is 22 (the default):
1.7. Run sudo blkid – With your SSD plugged in type the command:
pi@raspberrypi:~ $ sudo blkid
1.8. Identify drive – Your list will contain /dev/mmcblk0p1 and /dev/mmcblk0p2 (your SD card) and /dev/sda1 and /dev/sda2 (your SSD). We are looking for the PARTUUID of your SSD drive’s second partition (rootfs). This will end with -02.

Here is what we see from the above output:
/dev/mmcblk0p1 > PARTUUID="d9b3f436-01"
/dev/mmcblk0p2 > PARTUUID="d9b3f436-02"
/dev/sda1 > PARTUUID="d9b3f436-01"
/dev/sda2 > PARTUUID="d9b3f436-02"
Save or write a note somewhere of the values for both drives. We will use both PARTUUIDs for /dev/sda* and dev/mmcblk* later;
1.8.1. If you find out that both drives have exactly the same PARTUUID, then this is a problem that needs fixing. Here is how to change PARTUUID on the SSD using fdisk:
pi@raspberrypi:~ $ sudo fdisk /dev/sda <<EOF > /dev/null
>p
>x
>i
>0x33ac95d5
>r
>p
>w
>EOF

1.8.2. Check again with
pi@raspberrypi:~ $ sudo blkid

Now we have the following:
/dev/mmcblk0p1 > PARTUUID="d9b3f436-01"
/dev/mmcblk0p2 > PARTUUID="d9b3f436-02"
/dev/sda1 > PARTUUID="33ac95d5-01"
/dev/sda2 > PARTUUID="33ac95d5-02"
1.9. Edit "/boot/cmdline.txt" – The updated file will tell the Pi to boot the OS from the SSD:
Make a backup of "/boot/cmdline.txt":
pi@raspberrypi:~ $ sudo cp /boot/cmdline.txt /boot/cmdline.txt.bak
Edit the file "/boot/cmdline.txt":
pi@raspberrypi:~ $ sudo nano /boot/cmdline.txt
Before:
console=serial0,115200 console=tty1 root=PARTUUID=d9b3f436-02 rootfstype=ext4 elevator=deadline fsck.repair=yes rootwait quiet splash plymouth.ignore-serial-consoles
After:
dwc_otg.lpm_enable=0 console=serial0,115200 console=tty1 root=PARTUUID=33ac95d5-02 rootdelay=5 rootfstype=ext4 elevator=deadline fsck.repair=yes rootwait quiet splash plymouth.ignore-serial-consoles usb-storage.quirks=152d:0578:u
1.10. Create again the "ssh" file on the SD card – The "ssh" file can contain anything:
pi@raspberrypi:~ $ sudo nano /boot/ssh.txt
1.11. Reboot the Pi – If your Pi won’t boot put your micro SD into a computer and restore "/boot/cmdline.txt.bak" to get back into the Pi:
pi@raspberrypi:~ $ sudo reboot
1.12. Test the boot partition
pi@raspberrypi:~ $ findmnt -n -o SOURCE /
/dev/sda2
1.13. Edit "/etc/fstab" – This will ensure that firmware and bootloader are used correctly:
First let's get a list of all storage devices attached to the Pi and their IDs (we will use these later). Type the following command:
pi@raspberrypi:~ $ lsblk -o name,label,partuuid

Edit the file "/etc/fstab":
pi@raspberrypi:~ $ sudo nano /etc/fstab
Before:
proc /proc proc defaults 0 0
PARTUUID=d9b3f436-01 /boot vfat defaults 0 2
PARTUUID=d9b3f436-02 / ext4 defaults,noatime 0 1
We want to change the "/" partition (ending with -02) to load our SSD PARTUUID instead of the SD card. To do this simply replace the PARTUUID field on the line that has "/" in it with the PARTUUID from sda2. After making the change the "/etc/fstab" file looks like this:
After:
proc /proc proc defaults 0 0
PARTUUID=d9b3f436-01 /boot vfat defaults 0 2
PARTUUID=33ac95d5-02 / ext4 defaults,noatime 0 1
1.14. Reboot – The Pi should reboot normally now with ssh enabled.
pi@raspberrypi:~ $ sudo reboot
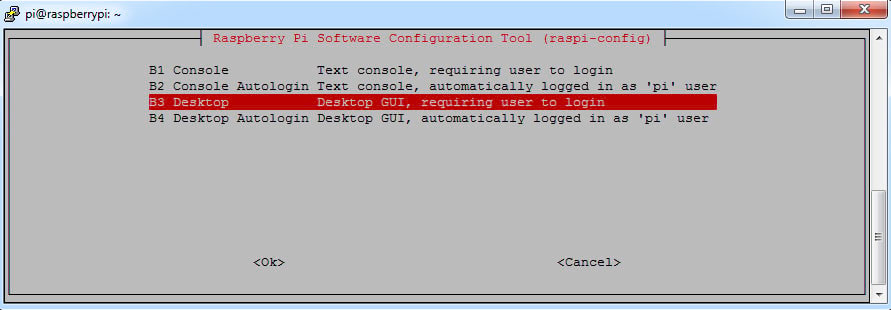
2. Set up "Boot options" (choose Desktop GUI, requiring user to login)
pi@raspberrypi:~ $ sudo raspi-config
Then Boot Options > Desktop / CLI > Desktop GUI, requiring user to login > OK
3. Set up "Interfacing options" (turn on SSH and VNC)
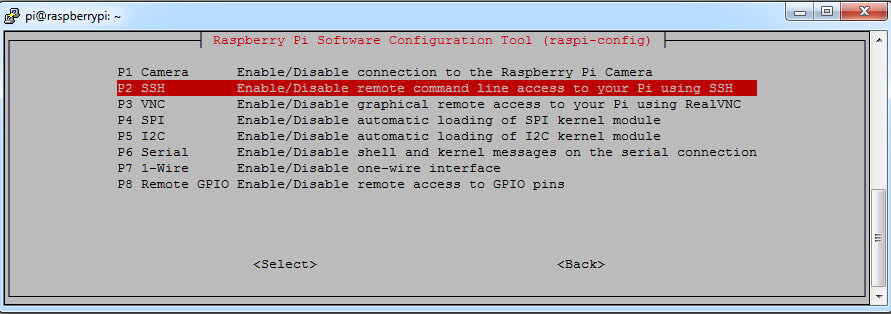
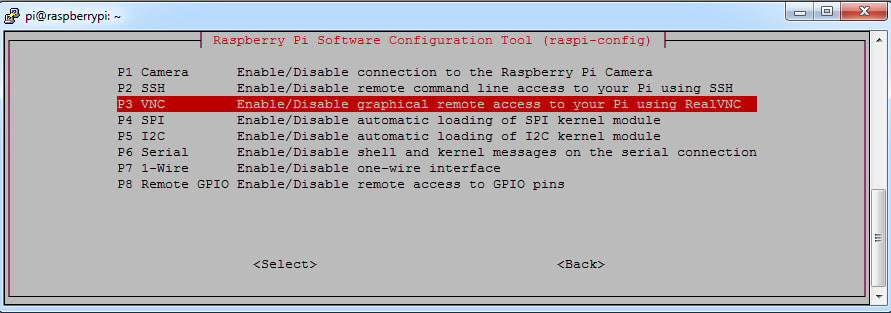
pi@raspberrypi:~ $ sudo raspi-config
Then Interfacing Options > SSH > Yes
and Interfacing Options > VNC > Yes
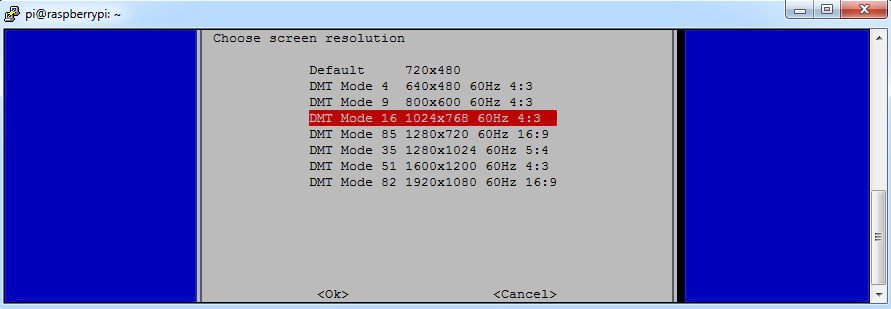
4. Set up "Advanced options" (set Resolution mode 16)
pi@raspberrypi:~ $ sudo raspi-config
Then Advanced Options > Resolution > DMT Mode 16 > OK
5. Set up VNC
Raspbian Buster with desktop comes with RealVNC ready to use. Here is the official guide >> Remote access with VNC.
- Enable RealVNC server (we already did that in the previous steps with "sudo raspi-config");
- Install RealVNC viewer (client) on your Windows 7 or Windows 10 PC >> RealVNC viewer download;
- Set up RealVNC viewer and make first connection with the RealVNC server on the Pi:
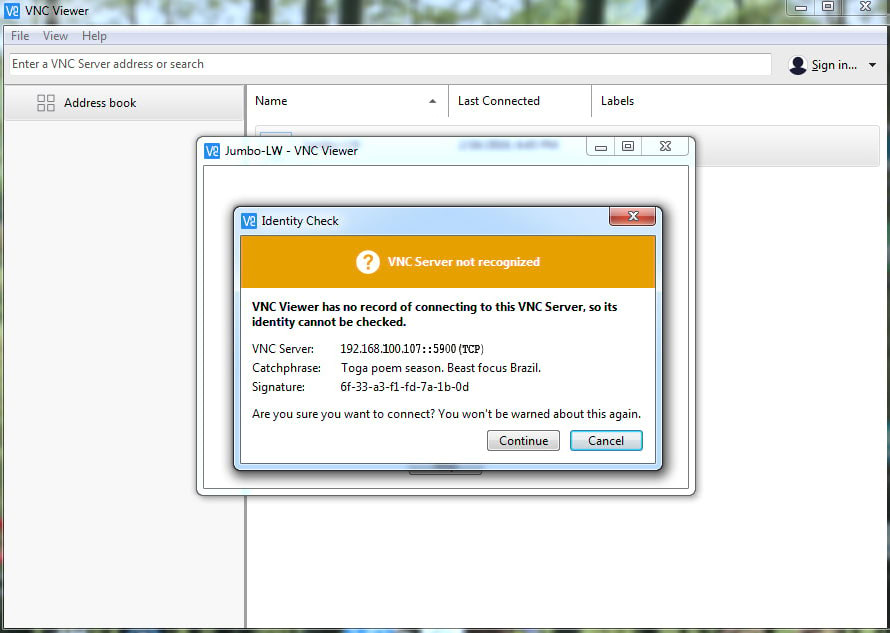
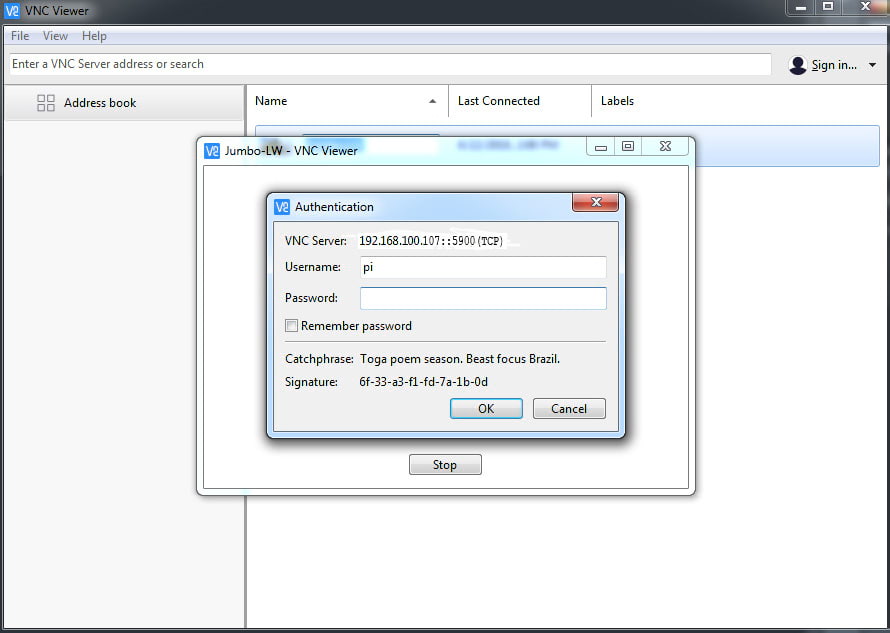
Next enter the default password - "raspberry":
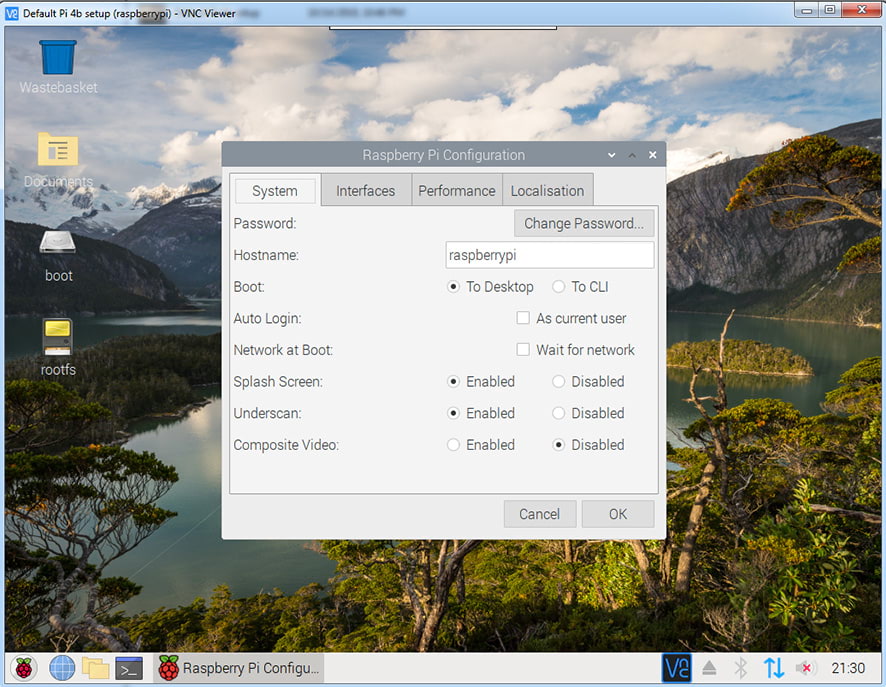
You can explore the Raspbian Buster desktop, remotely from your Windows PC:

6. Customize the desktop
What is worth customizing? First I would change hostname and password. Then turn off BlueTooth, WiFi and mute Audio. We could change also the location of the task bar, the background image and add some more Panel items, for displaying the CPU temperature, load and frequency.
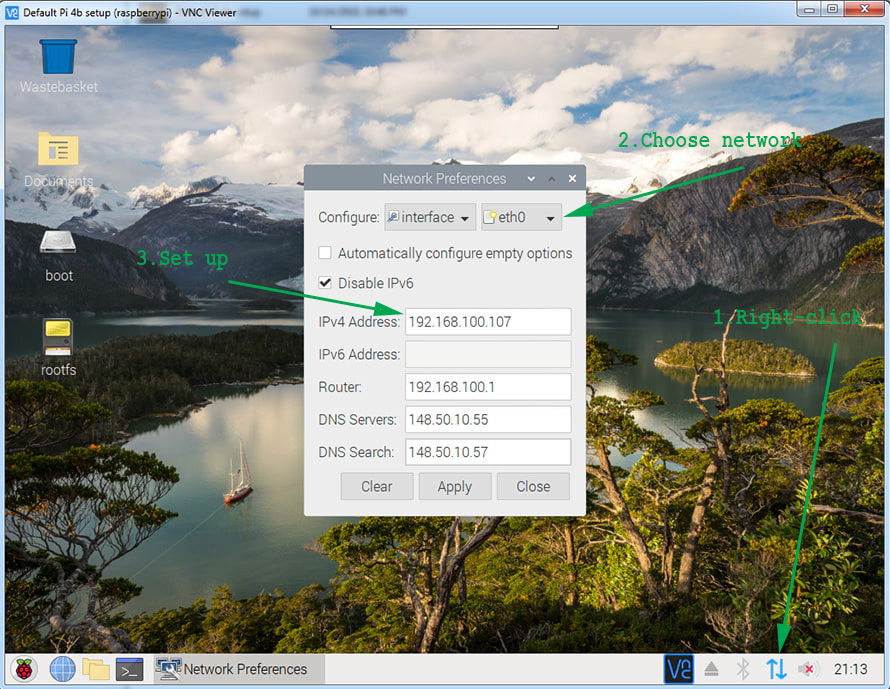
7. Set up fixed IP address
Set up a fixed local IP address and disable IPv6, right-clicking the Internet Panel item:
8. Disable WiFi and Bluetooth permanently
To completely disable the onboard WiFi and BlueTooth from the firmware on the Pi4, edit
pi@raspberrypi:~ $ sudo nano /boot/config.txt
by adding these two lines at the end of the file:
dtoverlay=disable-wifi
dtoverlay=disable-bt
To disable the systemd service that initialises the BT modem so it doesn't use the UART, use
pi@raspberrypi:~ $ sudo systemctl disable hciuart
9. Disable Audio permanently
To disable the onboard Audio, edit the same file:
pi@raspberrypi:~ $ sudo nano /boot/config.txt
by commenting out this line:
Before:
dtparam=audio=on
After:
#dtparam=audio=on
10. Set up swap file and swappiness
The RAM of the Pi 4b can be 1GB, 2GB or 4GB. Although you may have a 4GB RAM Pi, it is still good to have a swap file at least 2GB to be sure for example a compiler job will not run out of memory. To do so edit the swap-file config file:
pi@raspberrypi:~ $ sudo nano /etc/dphys-swapfile
This is the text of the new config file, it will configure a dynamic swap file, max 2GB:
# /etc/dphys-swapfile - user settings for dphys-swapfile package
# author Neil Franklin, last modification 2010.05.05
# copyright ETH Zuerich Physics Departement
# use under either modified/non-advertising BSD or GPL license
# this file is sourced with . so full normal sh syntax applies
# the default settings are added as commented out CONF_*=* lines
# where we want the swapfile to be, this is the default
CONF_SWAPFILE=/var/swap
# set size to absolute value, leaving empty (default) then uses computed value
# you most likely don't want this, unless you have an special disk situation
# CONF_SWAPSIZE=100
# set size to computed value, this times RAM size, dynamically adapts,
# guarantees that there is enough swap without wasting disk space on excess
CONF_SWAPFACTOR=2
# restrict size (computed and absolute!) to maximally this limit
# can be set to empty for no limit, but beware of filled partitions!
# this is/was a (outdated?) 32bit kernel limit (in MBytes), do not overrun it
# but is also sensible on 64bit to prevent filling /var or even / partition
CONF_MAXSWAP=2048
One final tweak is to set up swappiness. It is recommended to set swappiness to 10%. To do this we’ll edit
pi@raspberrypi:~ $ sudo nano /etc/sysctl.d/98-rpi.conf
and add this line at the end of the file
vm.swappiness=10
Do "sudo reboot" to activate the new bigger swap file. Check with "htop" the configuration is correct. You should have in mind that the size of the swap file will depend on the available free space in the partition. So for now this file will be small. However, when we expand the file system to occupy the whole SSD, the swap file will increase to its max size - 2GB.
11. CPU-status script
Here is a nice script to check the status of the CPU. Create a new file in "/usr/local/bin/":
pi@raspberrypi:~ $ sudo nano /usr/local/bin/cpu-status
The script that the file should contain:
# cpustatus
# Prints the current state of the CPU like temperature, voltage and speed.
# The temperature is reported in degrees Celsius (C) while
# the CPU speed is calculated in megahertz (MHz).
function convert_to_MHz {
let value=$1/1000
echo "$value"
}
function calculate_overvolts {
if [ $volts == "1.26" ]; then
overvolts="+0.06"
fi
if [ $volts == "1.32" ]; then
overvolts="+0.12"
fi
if [ $volts == "1.36" ]; then
overvolts="+0.16"
fi
echo "$overvolts"
}
temp=$(vcgencmd measure_temp)
temp=${temp:5:4}
volts=$(vcgencmd measure_volts)
volts=${volts:5:4}
if [ $volts != "1.20" ]; then
overvolts=$(calculate_overvolts $volts)
fi
minFreq=$(cat /sys/devices/system/cpu/cpu0/cpufreq/scaling_min_freq)
minFreq=$(convert_to_MHz $minFreq)
maxFreq=$(cat /sys/devices/system/cpu/cpu0/cpufreq/scaling_max_freq)
maxFreq=$(convert_to_MHz $maxFreq)
freq=$(cat /sys/devices/system/cpu/cpu0/cpufreq/scaling_cur_freq)
freq=$(convert_to_MHz $freq)
governor=$(cat /sys/devices/system/cpu/cpu0/cpufreq/scaling_governor)
echo "Temperature: $temp C"
#echo "Voltage: $volts V"
echo -n "Voltage: $volts V"
[ $overvolts ] && echo " $overvolts overvolts" || echo -e "\r"
echo "Min speed: $minFreq MHz"
echo "Max speed: $maxFreq MHz"
echo "Current speed: $freq MHz"
echo "Governor: $governor"
exit 0
Make the file executable of course, before you can run it:
pi@raspberrypi:~ $ sudo chmod +x /usr/local/bin/cpu-status
Now to run the script simply type:
pi@raspberrypi:~ $ cpu-status
12. Time-resync and time-status scripts
Correct time on the Pi is very important for the LOC staking wallet to work properly. Unfortunately the Pi has no real time clock, and each time you boot, the Pi gets time automatically form another NTP server. This is done by a command “timedatectl”, which is run at each booting cycle. Alternative way to sync time is to install a NTP server on the Pi and use it to sync time. Here we will use the default “timedatectl” service.
A good article, explaining “timedatectl”, can be found here >> Time sync Raspberry Pi.
The “timedatectl” service is run just once at booting the Pi. Then the Pi knows the time and date, but as time passes, a noticeable time drift happens, which means the clock on the Pi can go faster or slower, depending on many conditions: voltage instability, temperature changes, capacitor and resistor tolerances of the clock. For this reason the clock needs to be re-synced every now and then.
There is no specific command to force clock re-sync, so the way to do it is to just restart the “timedatectl” service. This is the command to restart the service and get time back to sync:
pi@raspberrypi:~ $ sudo systemctl restart systemd-timesyncd.service
For ease of use you can make a shell script in “usr/local/bin” like this
pi@raspberrypi:~ $ sudo nano /usr/local/bin/time-resync
The file contents should look like this:
#!/bin/bash
systemctl restart systemd-timesyncd.service
Make the file executable:
pi@raspberrypi:~ $ sudo chmod +x /usr/local/bin/time-resync
You can also make a command to check the status of the re-syncing service, you will be able to check when was the clock last re-synced and with which server the Pi was connected to get the right time:
pi@raspberrypi:~ $ systemctl status systemd-timesyncd.service
For ease of use you can make a shell script in “usr/local/bin” like this
pi@raspberrypi:~ $ sudo nano /usr/local/bin/time-status
The file contents should look like this:
#!/bin/bash
systemctl status systemd-timesyncd.service
Make the file executable:
pi@raspberrypi:~ $ sudo chmod +x /usr/local/bin/time-status
Now you can re-sync time and check the status with:
pi@raspberrypi:~ $ sudo time-resync
pi@raspberrypi:~ $ time-status
13. Create cron job for time-resync
To make the final touch it’s a good idea to make a cron job that will run time re-synchronization every 24 hours. To make a new cron job is used the command "crontab -e" and to list current cronjobs is used the command "crontab -l".
pi@raspberrypi:~ $ crontab -e
First time you run "crontab -e" it will ask to choose an editor, after that you ad this two lines at the end of the edited file:
4 9 * * * sudo time-resync
5 9 * * * sudo systemctl daemon-reload
After you reboot, the time on your Pi will be automatically re-synced every day at 9:04 am, and the systemctl daemon will be reloaded a minute later, to clear the usual warning message: "Warning: systemd-timesyncd.service changed on disk. Run 'systemctl daemon-reload' to reload units".
14. Spoof MAC address (only if you intend to run the Pi with a public IP address, i.e not behind NAT)
Edit the file "/boot/cmdline.txt" on the Bootloader SD card:
pi@raspberrypi:~ $ sudo nano /boot/cmdline.txt
by adding (appending) at the end of this file the following:
smsc95xx.macaddr=XX:XX:XX:XX:XX:XX
Of course replace the XX:XX:XX:XX:XX:XX with your desired MAC address.
Reboot and test:
pi@raspberrypi:~ $ sudo reboot
pi@raspberrypi:~ $ sudo ifconfig eth0
15. Back up Raspbian Buster with current configuration
It is a good time to make a backup of your Bootloader SD card and the Bootable SSD with Win32DiskImager. Backing up now, before expanding the file system, will make the total size of the backup files a lot smaller.
16. Expand the file system to occupy the whole SSD free space
There is a manual way to extend the "rootfs" partition and expand the file system on the SSD. The same task can be achieved much easier with "gparted", which is the partitioning tool with GUI. First we install the tool:
pi@raspberrypi:~ $ sudo apt install gparted
Now for this tool to work you should connect with the Pi via VNC, open a Terminal in the VNC viewer and then type the command:
pi@raspberrypi:~ $ sudo gparted
The tool is intuitive and easy to use:
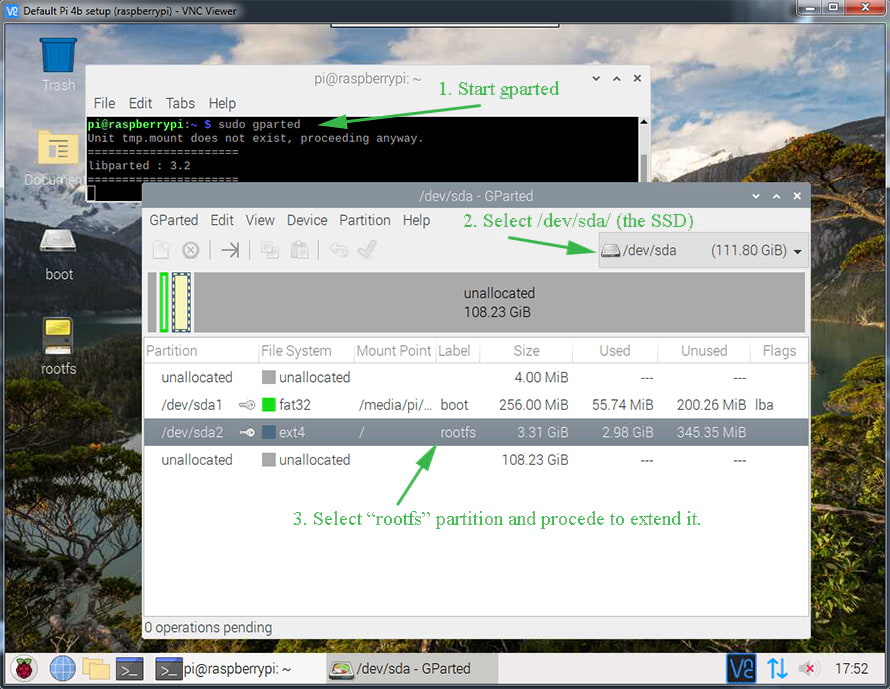
Select carefully the SSD first (/dev/sda), then select the partition "rootfs" and extend it. Apply all changes to complete the job. You can also unmount and delete the two unused partitions - "/dev/sda1" on the SSD and "/dev/mmcblk0p2" on the SD card. Apply changes. Reboot.
pi@raspberrypi:~ $ sudo reboot
17. Update and upgrade the Raspbian OS
pi@raspberrypi:~ $ sudo apt update
pi@raspberrypi:~ $ sudo apt upgrade
Now we have the basic setting up of the Raspberry Pi 4b completed. You can use this configuration to further create the developer environment necessary to recompile the LOC staking wallet or to install the wallet with GUI in a clean environment (without the dev libraries).
Hardware used in this article
- - Raspberry Pi 4b;
- - 5V/3A C-type connector power supply;
- - Western Digital 120GB Green SSD;
- - USB3-to-SATA adapter - ASMedia ASM115X chip set;
- - Armor case/heat sink for Raspberry Pi 4b;
- - 12V low noise Cooler Master cooling fan, powered separately.

If you find inaccuracies in this article or ways to improve it, please leave a comment below. In the next article we will recompile the LOC staking wallet with GUI on the Raspberry Pi 4b.
Related articles
The Guide to staking HYDRA on Raspberry Pi 4b
The Guide to staking LOCs on Raspberry Pi 4b (Pre-Hydra Testnet)
- Raspberry Pi 4b - basic setup with Raspbian Buster and getting ready to install the LOC staking wallet
- Recompiling and installing of LOC staking wallet with GUI on Raspberry Pi 4b
- Basic security check list for staking LOCs on Raspberry Pi 4 model b
- Using Ledger Nano S to protect the SSH session to the Raspberry Pi 4b with LOC staking wallet
The Guide to staking LOCs on Raspberry Pi 3b+ (Pre-Hydra Testnet)
Yours, Crypto Qu
Ways to support my work, if you find it helpful. Thank You!
Book with LockTrip
 Save up to 60% on hotel reservations with Locktrip booking engine!
Extra 5% discount for first booking with code Y8XVQ
Go to Locktrip ...
Our clients' websites 'live':
www.alcoart-bg.com www.cellular-concrete.net
www.ionitech.com www.nikol-n.bg www.stroitel-bg.com
Newest projects: www.tsninja.com
 Scan QR code for LOC wallet address to send donation to
 Comments are helping improve the article quality and are of great value for me!
 Scan QR code for HYDRA wallet address to send donation to
 Home of Digital Assets. Since 2014.
 Scan QR code for BTC wallet address to send donation to