Domain Kiosk
Creative website design and internet marketing studio
A step by step recompilation of LOC test staking wallet with GUI for Raspberry Pi 3B+
This is the first of a series of articles to help you recompile and set up a Raspberry Pi as a LOC staking wallet with GUI.
If you find inaccuracies or other ways to improve the article, please, leave a comment.
What do we show you in this article?
- How to prepare the Raspberry Pi 3b+ before you create the development environment on it. The same setup of the Pi is recommended when you make clean install of the Raspbian OS and prepare the Pi for staking.
- How to prepare the depositories lists.
- How to prepare the development environment.
- How to pre-compile and link objects.
- How to compile.
- How to create Debian package and install it.
- How to "test drive" the LOC staking wallet with GUI.
- How to install the staking wallet from the .deb package in clean environment.
1. Prepare the Raspberry Pi
- Download the "Raspbian Buster with desktop" image from the official Raspberry Pi website.
https://www.raspberrypi.org/downloads/raspbian/
- Burn the image file on a SD card with Etcher or Win32DiskImager. This SD card did the job well, though a smaller card would probably also do:
SanDisk Ultra microSDXC UHS-I Card 64GB

Of course you could consider to replace the SD card with a SSD, which is a much more reliable alternative, and the compilation will finish much faster on a SSD. Here is a good article "Raspberry Pi Storage Benchmarks 2019", that will give you an idea about SD cards vs SSDs comparison, when used with the Pi.
- At this point the easiest way to get things moving on is to connect to your Pi a monitor (on HDMI), a keyboard/mouse (on USB) and a LAN cable from your router. Alternatively you can access the Pi remotely with SSH, but first you need to find the Pi's IP address on your local network. Here is a good article about how to find Raspberry Pi IP address remotely. However SSH might not be enabled by default on the Pi. You can enable SSH by taking the SD card out of your Pi, inserting it into a USB card reader on your PC/laptop and creating an empty file with name "SSH" or "SSH.TXT" in the boot partition on the SD card. Next time you boot the Pi, SSH will be enabled and the "SSH" file automatically removed. The following configurations below could be finished then remotely, setting a fixed IP address in the proper config files and using sudo raspi-config. Here I would assume you have a monitor and a keyboard/mouse connected to the Pi.
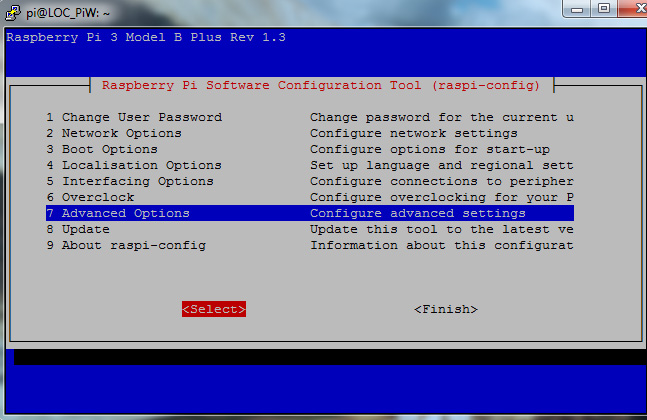
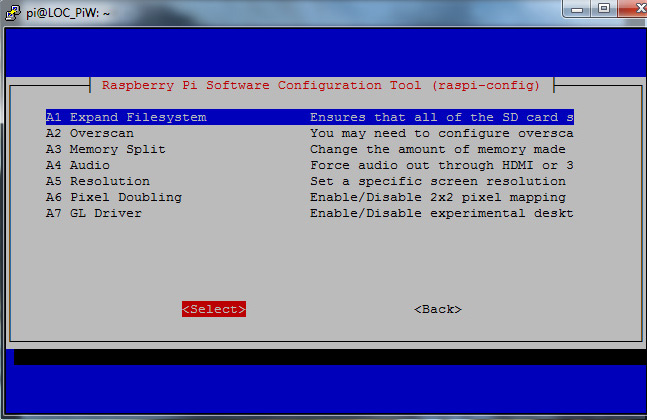
- Expand the filesystem. As you burnt a copy of the Raspbian Stretch with Desktop, the copied OS occupies just a portion of your 64GB space on the SD card. To use the whole space you should open a Terminal and type
sudo raspi-config
Then Advanced Options > Expand Filesystem > Select and confirm "OK" and reboot.
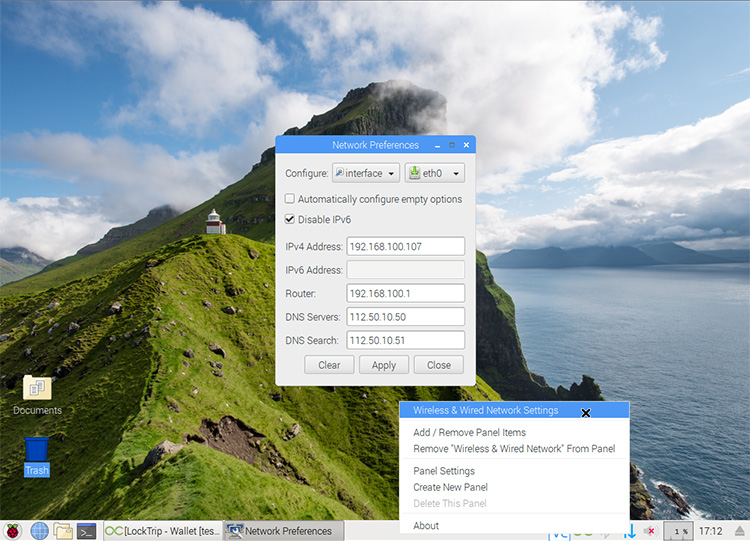
- Set up a fixed IP address on your Pi, you will need to know that address later to access the Pi remotely. Here I assume your Pi is connected to a monitor, keyboard/mouse and to a router behind a NAT. Your IP address will look like 192.168.XXX.X. Let say your NAT gateway IP is 192.198.100.1. Now right-click on the startup icon with the two arrows and disable "Automatically configure", then set up a fixed IP 192.168.100.107 on the Pi and a gateway address 192.168.100.1. DNS servers have usually the same address as your gateway (the local address of your router), but it's better to ask your internet provider, whether they could give you their DNS IP addresses for fixed IP configuration. Here you configure the Pi to connect via the cable LAN, not wireless.
- Do some further configuration from the Raspbian desktop.
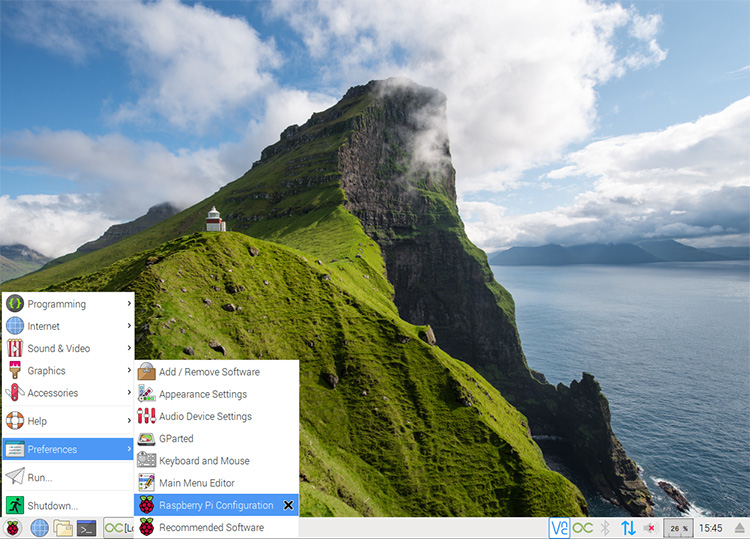
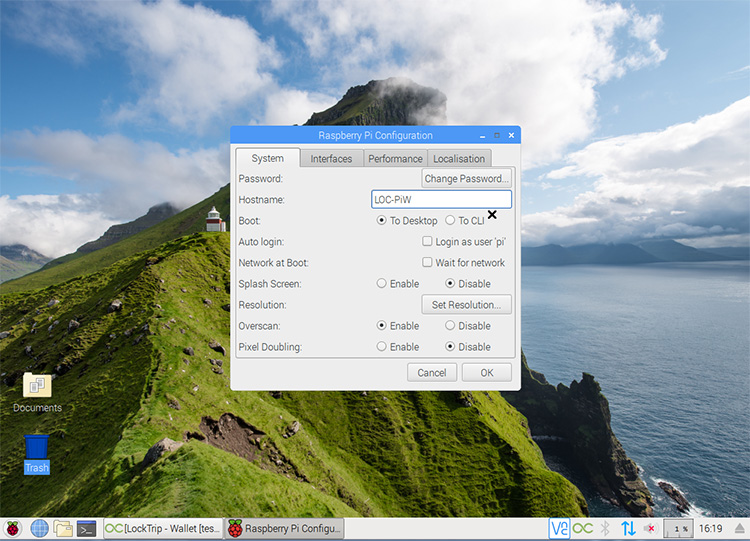
From Preferences > Raspberry Pi Configuration > System set a Hostname, this will be the name of the Pi computer, in this case we name it “LOC-PiW” – LOC Pi Wallet. Set up a password if you haven’t done so yet.
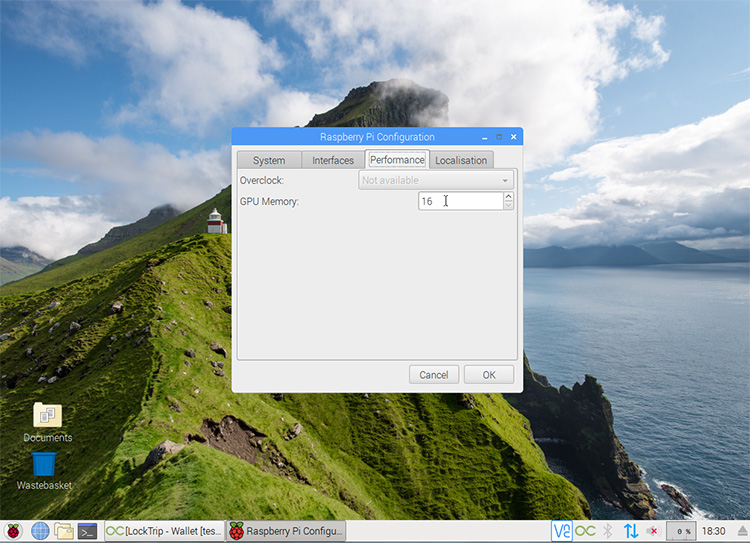
From Preferences > Raspberry Pi Configuration > Performance set GPU memory to 16 MB. We need as much available memory as possible for the compiler.
From Preferences > Raspberry Pi Configuration > Interfaces set SSH and VNC (in case you will be accessing the Pi remotely).
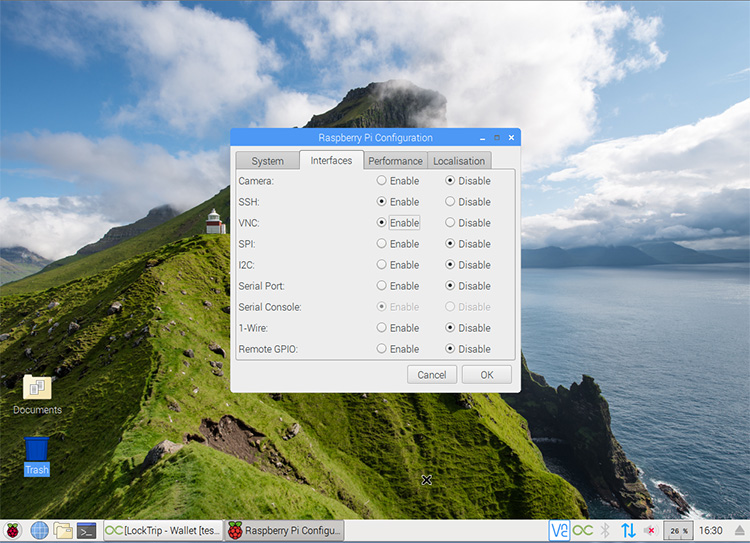
In most cases you will want to remotely operate the wallet on your Pi, so you will need a SSH enabled for terminal access and a VNC server on your Pi and a VNC viewer on the computer to get remote access to your Pi's desktop. When you confirm with OK as shown on the above screenshot, SSH will be enabled and RealVNC server will be installed on your Pi.
- To remotely access your Pi with Terminal via SSH from Linux or OS X you don't need anything else to install on the remote computer (the computer you’d control your Pi from). To remotely access from Windows however you need to download and install PUTTY on the remote computer. Later on I will access my Pi from Windows 7 with PUTTY.
https://www.putty.org/ (for Windows only)
- Download the RealVNC viewer and install on the remote computer (the computer you’d control your Pi from):
https://www.realvnc.com/en/connect/download/viewer/
RealVNC creates a secure connection between your Pi and the remote computer. In a following article I will show how to configure the RealVNC server on your Pi so that you have the security control in your hands (not just rely on the solution which the developing company has provided). For some the RealVNC server/client solution may be secure enough, we would want however to be sure we are in full control in terms of security.
- Next you need to set up a swap file. The RAM of the Pi is just 1GB, while the compiler will need at least 2GB to work properly. To do so open a Terminal and edit the swap-file config file with:
sudo nano /etc/dphys-swapfile
This is the text of the new config file, it will configure a dynamic swap file, max about 2GB. Memory reserved for GPU is not calculated in the dynamic (calculated) swap file:
# /etc/dphys-swapfile - user settings for dphys-swapfile package
# author Neil Franklin, last modification 2010.05.05
# copyright ETH Zuerich Physics Departement
# use under either modified/non-advertising BSD or GPL license
# this file is sourced with . so full normal sh syntax applies
# the default settings are added as commented out CONF_*=* lines
# where we want the swapfile to be, this is the default
CONF_SWAPFILE=/var/swap
# set size to absolute value, leaving empty (default) then uses computed value
# you most likely don't want this, unless you have an special disk situation
# CONF_SWAPSIZE=100
# set size to computed value, this times RAM size, dynamically adapts,
# guarantees that there is enough swap without wasting disk space on excess
CONF_SWAPFACTOR=2
# restrict size (computed and absolute!) to maximally this limit
# can be set to empty for no limit, but beware of filled partitions!
# this is/was a (outdated?) 32bit kernel limit (in MBytes), do not overrun it
# but is also sensible on 64bit to prevent filling /var or even / partition
CONF_MAXSWAP=2048
One final tweak is to set up swappiness. By default sappiness on the Raspberry Pi 3b+ is set to 60%, which means when 40% of RAM is used the Pi will begin to use the swap file. This is not good, because lots of RAM remains unused. It is recommended to set swappiness to 10%. To do this we’ll edit
sudo nano /etc/sysctl.d/98-rpi.conf
and add this line at the end of the file
vm.swappiness=10
Do sudo reboot to activate the new bigger swap file. Check with htop the configuration is correct. You should have in mind that the size of the swap file will form on demand. So initially this file will be small, but as the compiler runs the file will increase.
- Now you can disconnect the monitor and the keyboard/mouse from your Pi and access it remotely on your LAN. If you can access the Pi with SSH and VNC, you are ready to go with the next step.
2. Prepare the repositories lists
- Before you go further it's a perfect time to make a backup image of your SD card. Win32DiskImager is the tool you need for the job. Shut down the Pi, remove the SD card and plug it in a USB reader on your PC or Mac. Then start Win32DiskImager, type a name for the backup file and press the button "READ". Later you will be happy you did that, because if you mess up something on the Pi, you will be able to start all over again, but not from the very beginning. In case something goes wrong you will skip the initial configuration procedure and will resume from this point with already configured Pi from your image backup.
- Here starts the fun. Now you should change the contents of your repository files lists on the Pi. First you do:
sudo nano /etc/apt/sources.list
and replace the whole file contents with these lines:
# deb http://raspbian.raspberrypi.org/raspbian/ buster main contrib non-free rpi
# Uncomment line below then 'apt-get update' to enable 'apt-get source'
# deb-src http://raspbian.raspberrypi.org/raspbian/ buster main contrib non-free rpi
deb http://raspbian.raspberrypi.org/raspbian/ stretch main contrib non-free rpi
# Uncomment line below then 'apt-get update' to enable 'apt-get source'
# deb-src http://raspbian.raspberrypi.org/raspbian/ stretch main contrib non-free rpi
You will notice I uncommented only "stretch" binary repositories. This will load from "stretch" repositories the binary files, we need a "fresh start" from there.
- Next create a new file in the same directory:
sudo nano /etc/apt/sources.list.d/bitcoin.list
with this content (we will uncomment the lines later):
# deb http://ppa.launchpad.net/bitcoin/bitcoin/ubuntu artful main
# deb-src http://ppa.launchpad.net/bitcoin/bitcoin/ubuntu artful main
- Now do:
sudo apt update && sudo apt upgrade
Then comment out the "stretch" files in /etc/apt/source.list, and uncomment the "buster" files:
sudo nano /etc/apt/sources.list
The file now should look like this:
deb http://raspbian.raspberrypi.org/raspbian/ buster main contrib non-free rpi
# Uncomment line below then 'apt-get update' to enable 'apt-get source'
# deb-src http://raspbian.raspberrypi.org/raspbian/ buster main contrib non-free rpi
# deb http://raspbian.raspberrypi.org/raspbian/ stretch main contrib non-free rpi
# Uncomment line below then 'apt-get update' to enable 'apt-get source'
# deb-src http://raspbian.raspberrypi.org/raspbian/ stretch main contrib non-free rpi
And repeat:
sudo apt update && sudo apt upgrade
This will take a short while, as some dependencies would have to be recreated.
3. Prepare the development environment
sudo apt install build-essential libtool autotools-dev automake pkg-config libssl-dev libevent-dev bsdmainutils git cmake libboost-all-dev libcurl4-openssl-dev
sudo apt install software-properties-common
This (sudo add-apt-repository ppa:bitcoin/bitcoin) does not work in Raspbian, thus we install manually:
sudo nano /etc/apt/sources.list.d/bitcoin.list
Uncomment the lines, the edited file should look like this:
deb http://ppa.launchpad.net/bitcoin/bitcoin/ubuntu artful main
# deb-src http://ppa.launchpad.net/bitcoin/bitcoin/ubuntu artful main
sudo apt update
You will get an error. From the error message write down the missing public key -> D46F45428842CE5E
sudo apt install dirmngr
Run next command with last 8 digits from the missing pub key -> 8842CE5E
sudo apt-key adv --keyserver keyserver.ubuntu.com --recv-keys 8842CE5E
sudo apt update
sudo apt install libdb4.8-dev libdb4.8++-dev
If you want to build the Qt GUI, run this command:
sudo apt install libqt5gui5 libqt5core5a libqt5dbus5 qttools5-dev qttools5-dev-tools libprotobuf-dev protobuf-compiler qrencode
The command below will download the most recent (current) as of writing this article branch:
git clone -b qtum_merge https://github.com/LockTrip/Blockchain.git --recursive
cd Blockchain
4. Pre-compile and link objects
- Autogen may prompt to install some more dependencies if needed
./autogen.sh
./configure
You can use ./configure with options to exclude "test" and "bench" files from the compilation, so it will finish faster:
./configure --disable-tests --disable-bench --disable-gui-tests
- If you reached this point and ./configure finished with no errors, then there should be no problem with the next step. Now make a backup of you SD card!
- The next step took about 10 hours to complete on the SD card (about 4 hours on a SSD). If you care about your Pi, now it's the right time to check how well it is prepared to perform "under pressure". Before stressing out the Pi, check if you have heat sinks installed on the right places. The Raspberry Pi 3b+ did well without a heat sink on the CPU, it has already a pretty good metal cover, which dissipates heat well, but you definitely would want to place a heat sink on the memory chip (on bottom of the PC Board) and on the USB/LAN chip (on top of the PC Board just next to the USB ports). Wireless and Bluetooth should be off, so there will be no heat produced there. If your Pi is in a box, leave the box cover open. Of course these are the minimums. You could install a huge heat sink on the processor, a cooling fan or two, etc. Just avoid the mistake to cool your CPU only and to forget the rest heat producers unprotected.
- It's also a good idea to make an "alias" for a command that you will use from time to time to check the temperature of the CPU.
sudo nano /home/pi/.bash_aliases
Add this line below in the file /home/pi/.bash_aliases to create the "alias":
alias temp='/opt/vc/bin/vcgencmd measure_temp'
Next time you boot the Pi, simply type
temp
and you will have a temperature measurement from the CPU displayed in the terminal.
- Now open a new terminal and type htop to monitor how your CPU performs. The Pi has a 4 core processor, so the loads you should see should be about "4" if everything is going normal and the processor is catching up with work. If you see loads above "4" for short periods of time, that's also OK. If loads are below "4", your processor is happy to have some free time to relax. The three different digits for average CPU load show the load in three different time frames: the first digit is the load during the last minute, the second digit is the load during the last 5 minutes and the last digit - the load during the past 15 minutes. Measure temperature at high loads (about "4"), it should be below 70°C if all is good.
Now you are ready to hit the make command below.
5. Compile
make -j2
Perfect point to make a backup copy of your SD card!
6. Create Debian package and Install
This (checkinstall) is a fast way to create a .deb package and install it. The command will first ask a few questions you need to answer (like "Should I create a default set of package docs?", etc.), then install the binaries in /usr/local, create the Debian package and lastly create a .tgz Archive.
You can find out more about this command here >> checkinstall Debian Wiki
sudo apt install checkinstall
sudo checkinstall
You can also use checkinstall with options, to avoid some manual typing. Customize the wallet version of course before you use these options:
sudo checkinstall --maintainer="office @ thedomainkiosk.com" --pkgname="locktrip" --pkgversion="0.17" --pkgrelease="3" --requires="libboost-program-options1.62.0,libboost-thread1.62.0,libboost-chrono1.62.0,libboost-random1.62.0,libprotobuf10,libevent-pthreads-2.0-5,dirmngr,libdb4.8,libdb4.8++"
Finally you need to "chown" the .deb file to be able to move it around and use it to install the wallet from it.
sudo chown pi:pi ~/Blockchain/your-package-name-and-version_armhf.deb
7. Start the wallet with GUI ("test drive")
To start the wallet you need to access the Raspberry Pi via VNC and launch a terminal in the VNC viewer. Then in the terminal type:
/usr/local/bin/locktrip-qt -testnet
8. A clean wallet with GUI in use
As we created a developer environment on the SD card, for security reasons it is safer to make a copy of the .deb package file on a removable flash drive, get a fresh image of the Raspbian Buster with desktop, make sure you access remotely the Pi with SSH and via VNC, and install the .deb package in the clean now environment on your Pi. You can use dpkg, which will need to manually install missing dependencies, or apt install, which will install dependencies automatically and use dpkg in the background to install the .deb package.
- Installing with dpkg (manual installation of dependencies)
- Before we install the .deb package, we need to install the missing packages (libraries) it depends on. Here is a detailed manual way to do so:
sudo apt install libboost-program-options1.62.0 libboost-thread1.62.0 libboost-chrono1.62.0 libboost-random1.62.0 libprotobuf10 libevent-pthreads-2.0-5
sudo apt install dirmngr
sudo apt-key adv --keyserver keyserver.ubuntu.com --recv-keys 8842CE5E
sudo nano /etc/apt/sources.list.d/bitcoin.list
The contents of the file should be:
deb http://ppa.launchpad.net/bitcoin/bitcoin/ubuntu artful main
# deb-src http://ppa.launchpad.net/bitcoin/bitcoin/ubuntu artful main
sudo apt update
sudo apt install libdb4.8 libdb4.8++
- Now we make a new directory ~/Locktrip and copy there the .deb file from the flash memory stick:
mkdir Locktrip
cp /media/pi/your-usb/your-package-name-and-version_armhf.deb ~/Locktrip
cd Locktrip
- The following command will install the files from the .deb package in /usr/local
sudo dpkg -i your-package-name-and-version_armhf.deb
- Then in the VNC viewer launch a terminal and type the command:
/usr/local/bin/locktrip-qt -testnet
- Installing with apt install (automatic installation of dependencies)
Instead of using dpkg you can use apt install which will first install the dependencies and then use dpkg to install the .deb package.
- First we add the missing repositories:
sudo apt install dirmngr
sudo apt-key adv --keyserver keyserver.ubuntu.com --recv-keys 8842CE5E
sudo nano /etc/apt/sources.list.d/bitcoin.list
The contents of the file should be:
deb http://ppa.launchpad.net/bitcoin/bitcoin/ubuntu artful main
# deb-src http://ppa.launchpad.net/bitcoin/bitcoin/ubuntu artful main
sudo apt update
- Next we make a new directory ~/Locktrip and copy there the .deb file from the flash memory stick:
mkdir Locktrip
cp /media/pi/your-usb/your-package-name-and-version_armhf.deb ~/Locktrip
cd Locktrip
- Finally the following command will install the dependencies and then the .deb package in /usr/local. Please note that we use the full (absolute) path to the .deb package.
sudo apt install /home/pi/Locktrip/your-package-name-and-version_armhf.deb
Then in the VNC viewer launch a terminal and type the command:
/usr/local/bin/locktrip-qt -testnet
In a follow-up article we will customize SSH and VNC for convenience and security.
Related articles
The Guide to staking HYDRA on Raspberry Pi 4b
The Guide to staking LOCs on Raspberry Pi 4b (Pre-Hydra Testnet)
- Raspberry Pi 4b - basic setup with Raspbian Buster and getting ready to install the LOC staking wallet
- Recompiling and installing of LOC staking wallet with GUI on Raspberry Pi 4b
- Basic security check list for staking LOCs on Raspberry Pi 4 model b
- Using Ledger Nano S to protect the SSH session to the Raspberry Pi 4b with LOC staking wallet
The Guide to staking LOCs on Raspberry Pi 3b+ (Pre-Hydra Testnet)
Yours, Crypto Qu
Ways to support my work, if you find it helpful. Thank You!
Book with LockTrip
![]() Save up to 60% on hotel reservations with Locktrip booking engine!
Save up to 60% on hotel reservations with Locktrip booking engine!
Extra 5% discount for first booking with code Y8XVQ
Go to Locktrip ...
 Scan QR code for LOC wallet address to send donation to
 Comments are helping improve the article quality and are of great value for me!
 Scan QR code for HYDRA wallet address to send donation to
 Scan QR code for BTC wallet address to send donation to
Our clients' websites 'live':
www.cellular-concrete.net www.ionitech.com www.nikol-n.bg www.stroitel-bg.com
Newest projects: www.hydragon.blog