Domain Kiosk
Creative website design and internet marketing studio
Using Ledger Nano S to protect the SSH session to the Raspberry Pi 4b with LOC staking wallet
In this article we will make a setup that will allow to use Ledger Nano S to generate a pair of keys and use it to protect the SSH session to the LOC staking Raspberry Pi.
It is important to understand that the Ledger Nano S will protect the login to the remote SSH session, so you will be sure no hacker with a keylogger can grab (steal) your password and then use it to access your staking Pi remotely. Very often the reason for hacks is that the password has been "leaked" because of some silly mistake the user did. Using Ledger Nano S gives excellent protection against such mistakes too.
To fully protect your staking Pi however you have to read and understand the first three articles in my Guide to staking LOCs on Raspberry Pi 4b, then use the knowledge in this following article to elevate security to a next level.
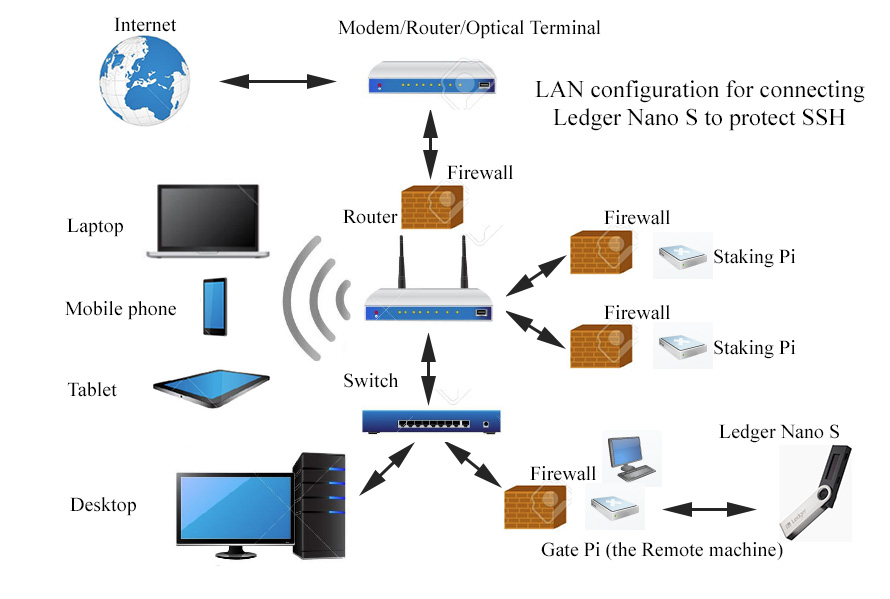
Let's begin with a diagram showing the LAN setup to use the Ledger Nano S. We need an extra Raspberry Pi (a Pi3b+ does an excellent job) to use it as a Gate to the LOC staking Pi. The Gate "pi@Lock" is connected to a monitor and to a keyboard/mouse. When all is set up the staking Pi should have a firewall configured to allow SSH access only from the IP address of the Gate Pi. Note that instead of the extra Raspberry Pi you can use any Linux or Mac machine as the Gate (the Remote machine). Here is the diagram:
Steps to set up the software on the Gate Pi, Staking Pi and Ledger Nano S
1. Make sure you have Python 3 and pip3 running on your Remote machine "pi@Lock" (192.168.100.103)
pi@Lock:~ $ which python3
you should see returned this:
/usr/bin/python3
and
pi@Lock:~ $ which pip3
should return this:
/usr/bin/pip3
2. To have the command line tools communicate with Ledger Nano S, you also need libusb to be installed
Check if you already have libusb installed:
pi@Lock:~ $ ldconfig -p | grep libusb
If you have libusb installed you should be seeing this:
libusbmuxd.so.4 (libc6,hard-sudfloat) => /usr/lib/arm-linux-gnueabihf/libusbmuxd.so.4
libusb-1.0.so.0 (libc6,hard-float) => /lib/arm-linux-gnueabihf/libusb-1.0.so.0
If installed already, as checked above, skip this step, otherwise install libusb:
pi@Lock:~ $ sudo apt install libffi-dev
or
pi@Lock:~ $ pip3 install cffi and pi@Lock:~ $ pip3 install libusb
3. Install Ledger Agent on the Remote machine
pi@Lock:~ $ pip3 install ledger_agent
4. Verify folders where Ledger Agent has been installed
pi@Lock:~ $ pip3 uninstall ledger_agent
Uninstalling ledger-agent-0.9.0:
/home/pi/.local/bin/ledger-agent
/home/pi/.local/bin/ledger-gpg
/home/pi/.local/bin/ledger-gpg-agent
/home/pi/.local/bin/ledger_agent.py
/home/pi/.local/lib/python3.7/site-packages/ledger_agent-0.9.0.dist-info/*
Proceed (y/n)?n
Reply "no", as we are just using this to verify the Ledger Agent is installed, not to uninstall it.
5. Run this command to add udev-rules:
pi@Lock:~ $ wget -q -O - https://raw.githubusercontent.com/LedgerHQ/udev-rules/master/add_udev_rules.sh | sudo bash
6. Install the SSH/PGP Agent app on Ledger Nano S from Ledger Live
Turn on Developer mode in Ledger Live: Settings > Experimental features > Developer mode. Then you will find and be able to download from Ledger Live the SSH/PGP Agent app on your Ledger Nano S.
7. Generate your first SSH Key with the Ledger Nano S on your Remote machine using Ledger Agent
Plug and unlock your Ledger Nano S. Scroll through the applications, and select SSH/GPG Agent pressing both Ledger Nano S buttons. Once the app has launched, your Ledger Nano S should display "Application is ready".
Switch back to your terminal, and run:
pi@Lock:~ $ /home/pi/.local/bin/ledger-agent pi@Lock
Accept on Ledger Nano S. Now you have generated the SSH public key for the Protected machine "pi@Wallet-D" and it is displayed in the terminal:
ecdsa-sha2-nistp256 AAAAE2VjZHNhLXNoYTItbmlzdHAyNTYAAAAIbmlzdHAyNTYAAABBBAQgjkaovZjENezel
5Md604dcUypaOFuX6L8r5xrkyubLtOJZAEL3aSoJ/HyQGx2M+6JKr/Ih6Mx4DaFuNDhCyo= <ssh://pi@Lock|nist256p1>
8. Copy-paste the whole string onto the Protected machine "pi@Wallet-D" (192.168.100.107) into ~/.ssh/authorized_keys file
(pi@Wallet-D:~ $ mkdir ~/.ssh/)
pi@Wallet-D:~ $ nano ~/.ssh/authorized_keys
You're now ready to use SSH with your newly generated key.
9. Using the Ledger Agent shell wide
After the first key generation, the Ledger Agent printed a classic SSH ECDSA public key along with a string between < >. This is the string in our example:
<ssh://pi@Lock|nist256p1>
This string is a Ledger Agent identity. Add it to a configuration file on the Remote machine, i.e. ~/.ssh/ledger.conf :
(pi@Lock:~ $ mkdir ~/.ssh/)
pi@Lock:~ $ echo "<ssh://pi@Lock|nist256p1>" >> ~/.ssh/ledger.conf
Then run the Ledger Agent:
pi@Lock:~ $ /home/pi/.local/bin/ledger-agent ~/.ssh/ledger.conf -s -v
2019-07-13 13:34:59,014 INFO identity #0: <ssh://pi@Lock|nist256p1> [__init__.py:274]
2019-07-13 13:34:59,023 INFO using [b'ttyname=/dev/pts/1', b'display=:0.0'] for pinentry options [ui.py:79]
2019-07-13 13:34:59,043 INFO running '/bin/bash' with {'SSH_AUTH_SOCK': '/tmp/trezor-ssh-agent-5fxmykuj', 'SSH_AGENT_PID': '982'} [server.py:156]
This spawns a new shell with an SSH Agent using all the identities stored into the ledger.conf file.
10. Set up an alias on the Remote machine to easily start the Ledger Agent
pi@Lock:~ $ echo "alias ledger='/home/pi/.local/bin/ledger-agent ~/.ssh/ledger.conf -s -v'" >> ~/.bash_aliases
pi@Lock:~ $ source ~/.bash_aliases
11. Set up host file on the Remote machine to use hostname instead of IP address in the SSH session start command
pi@Lock:~ $ sudo bash -c 'echo "192.168.100.107 Wallet-D" >> /etc/hosts'
12. Now you can simply open a terminal and run:
pi@Lock:~ $ ledger
pi@Lock:~ $ ssh pi@Wallet-D
or
pi@Lock:~ $ ssh pi@Wallet-D -p 2784 (for custom SSH port)
or
pi@Lock:~ $ ssh pi@Wallet-D -p 2784 -L 5924:127.0.0.1:5924 (for tunnel for VNC via SSH)
This will use the SSH key stored into the Ledger Nano S.
NOTE! Don't launch the ledger-agent from your .bashrc or .zshrc since it will spawn another and another in an infinite loop.
13. Make a custom command in "/usr/local/bin"
pi@Lock:~ $ sudo nano /usr/local/bin/sshtunnel-D
The content of the file is:
ssh pi@Wallet-D -p 2784 -L 5924:127.0.0.1:5924
Make it executable
pi@Lock:~ $ sudo chmod +x /usr/local/bin/sshtunnel-D
14. Turn "off" password authentication and turn "on" both key authentication and used key file on the Protected machine
pi@Wallet-D:~ $ sudo nano /etc/ssh/sshd_config
and change each of these lines:
PubkeyAuthentication yes
and
AuthirizedKeyFile .ssh/authiruzed_keys
and
PasswordAuthentication no
15. Restart SSH service
pi@Wallet-D:~ $ sudo /etc/init.d/ssh restart
16. Switching between Ledger Nano S and Google 2FA
pi@Wallet-D:~ $ sudo nano /etc/ssh/sshd_config
and change this line:
ChallengeResponseAuthentication yes (Google 2FA will work and Ledger is "off")
or
ChallengeResponseAuthentication no (Google 2FA is "off" and Ledger is "on")
and then restart the SSH service
pi@Wallet-D:~ $ sudo /etc/init.d/ssh restart
For additional information
- https://github.com/romanz/trezor-agent
- https://github.com/romanz/trezor-agent/blob/master/doc/INSTALL.md
- https://github.com/romanz/trezor-agent/blob/master/doc/README-SSH.md
- https://github.com/LedgerHQ/ledger-app-ssh-agent/issues/18
Hardware used in this article
The Staking Pi (Protected machine) > pi@Wallet-D
- - Raspberry Pi 4b;
- - 5V/3A C-type connector power supply;
- - Samsung 970 EVO Plus 250GB NVMe M.2 SSD;
- - X870 NVMe M.2 SSD Storage Expansion Board (Adapter) - JMicron Technology Corp. chip set;
- - Empty SD card;
- - Armor case/heat sink for Raspberry Pi 4b;
- - 12V low noise Jiesammy cooling fan, powered from the Pi;
The Gate Pi (Remote machine) > pi@Lock
- - Raspberry Pi 3b+;
- - 5V/3A Mini-type connector power supply;
- - SanDisk Ultra microSDXC 16GB card;
- - Acrylic ABS Plastic Case
- - CNC Extreme Cooling Fan+Heatsink Kit For Raspberry Pi 3b+;
- - 2.4G Wireless mini Keyboard with Touchpad for PC, Google Andriod TV Box;
- - Ledger Nano S.

If you find inaccuracies in this article or ways to improve it, please leave a comment below.
Related articles
The Guide to staking HYDRA on Raspberry Pi 4b
The Guide to staking LOCs on Raspberry Pi 4b (Pre-Hydra Testnet)
- Raspberry Pi 4b - basic setup with Raspbian Buster and getting ready to install the LOC staking wallet
- Recompiling and installing of LOC staking wallet with GUI on Raspberry Pi 4b
- Basic security check list for staking LOCs on Raspberry Pi 4 model b
- Using Ledger Nano S to protect the SSH session to the Raspberry Pi 4b with LOC staking wallet
The Guide to staking LOCs on Raspberry Pi 3b+ (Pre-Hydra Testnet)
Yours, Crypto Qu
Ways to support my work, if you find it helpful. Thank You!
Book with LockTrip
![]() Save up to 60% on hotel reservations with Locktrip booking engine!
Save up to 60% on hotel reservations with Locktrip booking engine!
Extra 5% discount for first booking with code Y8XVQ
Go to Locktrip ...
 Scan QR code for LOC wallet address to send donation to
 Comments are helping improve the article quality and are of great value for me!
 Scan QR code for HYDRA wallet address to send donation to
 Scan QR code for BTC wallet address to send donation to
Our clients' websites 'live':
www.cellular-concrete.net www.ionitech.com www.nikol-n.bg www.stroitel-bg.com
Newest projects: www.hydragon.blog