Domain Kiosk
Creative website design and internet marketing studio
Basic security check list for staking LOCs on Raspberry Pi 4 model b
Let's harden the security of our staking Pi. Our goal is to keep the minimal number of open ports on the Pi and secure them.
After following the steps in this article you will be able to use the QT version of the wallet (with GUI) on your Pi remotely, and the only listening port to the outer world will be the listening port of the LOC staking wallet (1335), necessary to establish inbound connections with other nodes. All other ports will be closed or only listening (for the SSH session) to your every-day computer (the remote machine, where you access the Pi from).
An assumption in this article is that your Pi and remote machine are both on your LAN and the remote machine is Windows 7 to Windows 10. In case your remote machine is Linux or MAC some tools and commands will differ (this is a topic for another article, though principals are the same).
Just before reading further it is recommended to check out the previous articles from my Guide to staking LOCs on Raspberry Pi 4b:
- Raspberry Pi 4b - basic setup with Raspbian Buster and getting ready to install the LOC staking wallet;
- Recompiling and installing of LOC staking wallet with GUI on Raspberry Pi 4b.
In case you have already done so, here is the basic security checklist:
What we do to strengthen the security?
- Set up a custom SSH port;
- Set up a custom VNC port;
- Create a tunnel for VNC via the SSH session;
- Install UFW (Uncomplicated Firewall) and setup UFW rules;
- Set up port 1335 for the wallet on the router;
- Check for open ports;
- Set up Google 2FA to protect the SSH session;
1. Set up a custom SSH port;
Here is the official guide how to set up SSH on your Pi >> Remote access with SSH.
It should be noted that you can use SSH on your LAN or on the Internet. In this article I describe the case, when you are using SSH on your LAN, which means you are behind NAT (Network address translation protocol) on your router. This brings an extra layer of protection for the Pi from outside hackers. You need a fixed local IP addresses on your LAN both for the Pi and the remote machine.
The default SSH port used on the Pi is port 22. We change that port to a custom one, different from 22. To do this follow these steps.
- Open a SSH session with the Pi using Putty:
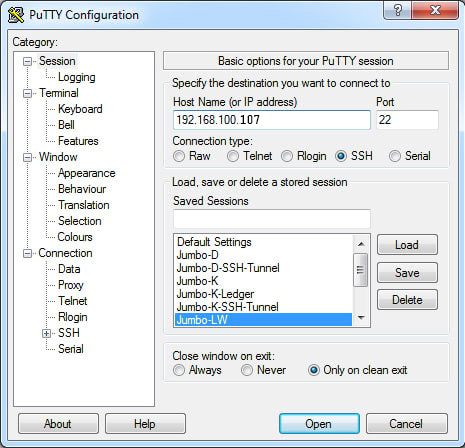
- In the SSH session window open the file "/etc/ssh/sshd_config" with nano editor:
sudo nano /etc/ssh/sshd_config
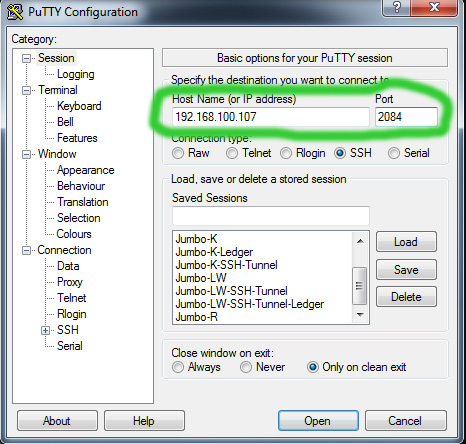
- In this file find the line
# Port 22
- Uncomment the line and change the default port. For example it should look like this
Port 2084
- Save the file with nano editor and then reboot the Pi:
sudo reboot
- Now you can access the Pi via SSH on port 2084:
2. Set up a custom VNC port;
In the first article of this series for the Pi 4b we enabled RealVNC server on the Pi, installed RealVNC viewer on the Windows 7/10 PC and connected to the default port of the RealVNC server (5900). Here we will start the RealVNC server with a virtual desktop and at a custom port. To do so run these commands:
- Open a remote SSH session with the Pi with Putty and then start the RealVNC server with a command that will create a virtual desktop with the desired geometry (window size) and with custom listening port (5914) for the VNC server:
vncserver :14 -geometry 1900x950 -depth 24 -nolisten tcp
The above geometry works fine for Full HD, for a smaller monitor on your Windows 7/10 machine you can use different geometry, i.e.:
vncserver :14 -geometry 1250x900 -depth 24 -nolisten tcp
You can make a short command for ease of use in the "/usr/local/bin" directory:
sudo nano /usr/local/bin/startVNC
The contents of the file should be:
#!/bin/bash
vncserver :14 -geometry 1900x950 -depth 24 -nolisten tcp
Make this file executable:
sudo chmod +x /usr/local/bin/startVNC
Now to start the RealVNC server with virtual desktop and custom port 5914 you just type in the SSH session window:
startVNC
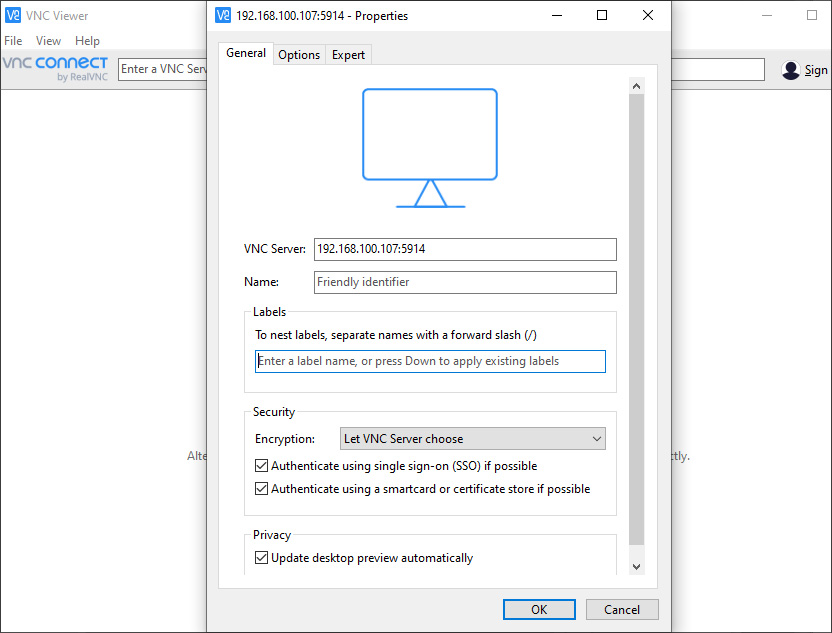
- Connect from your remote machine (the Windows 7 PC) with the RealVNC Viewer, using now the custom port 5914:
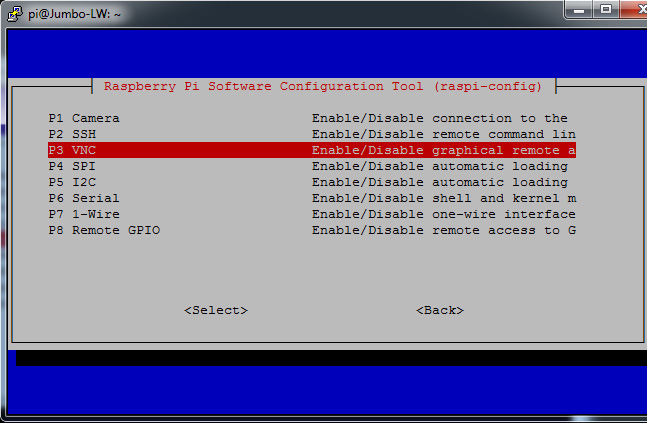
- It is recommended to disable the autostart of the RealVNC server on the default port 5900 every time you reboot the Pi. For this you simply disable VNC with "sudo reaspi-config".
sudo reaspi-config
Then Interfacing Options > VNC > Select, confirm "NO" and reboot.
- If you followed the steps above, the RealVNC server is running and waiting for connections on the custom port 5914. When you reboot, you will need to first manually launch the RealVNC server with the short command we created
startVNC
- Instead of using the RealVNC viewer on the Windows 7/10 PC, you can use a different viewer, even without encryption of the VNC session, as in the next steps we will pass the VNC session through a tunnel via the encrypted SSH session. I like Turbo VNC viewer so let see how to use it instead of the RealVNC viewer. We install TurboVNC client (the viewer) on the Windows 7/10 machine from here >> TurboVNC files.
- Now we need to connect once with the RealVNC viewer to disable the encryption of the VNC session. We do this, because the Turbo VNC viewer cannot use the encryption used by the RealVNC server. We set up also a password for the Turbo VNC viewer.
To disable encryption and set a password connect first with the RealVNC viewer, then right-click on the Panel item of the RealVNC server and choose Options from the menu.
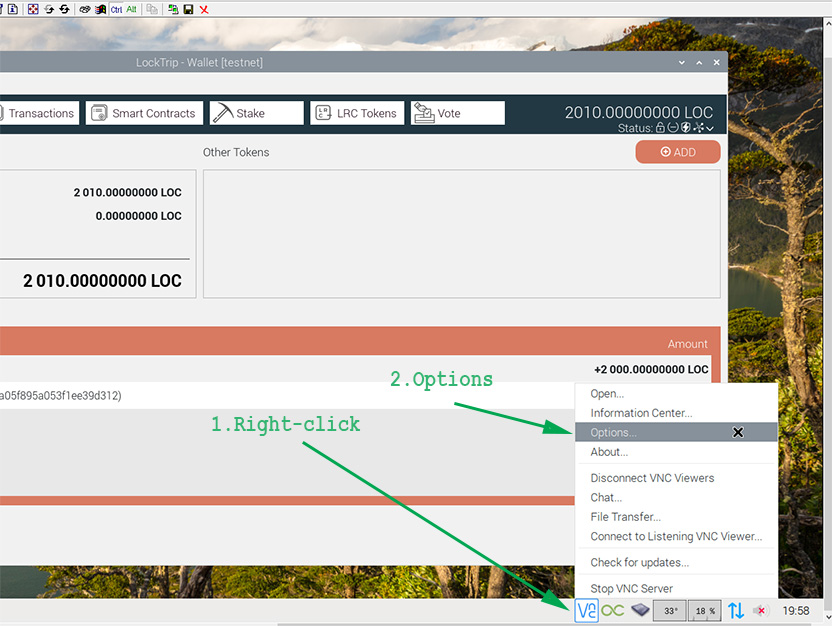
Then set Encryption to "Prefer off" and Authentication to "VNC password" (you will get a prompt to set the password).
- Next disconnect the RealVNC viewer, and use the following settings in the TurboVNC viewer on your remote PC to connect:
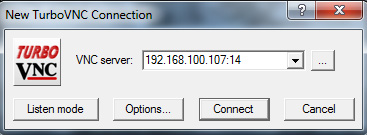
Type the password when asked and you will be connected. Ignore the warning that the VNC session is not encrypted. Remember, on the next step we pass it through a tunnel via the encrypted SSH session!
3. Create a tunnel for VNC via the SSH session;
- This is the command that will start the RealVNC server with port listening to the local machine (we just added the option -localhost to the command we used before):
vncserver :14 -geometry 1900x950 -depth 24 -localhost -nolisten tcp
The above geometry works fine for Full HD, for a smaller monitor on your Windows 7/10 machine you can use different geometry, i.e.:
vncserver :14 -geometry 1250x900 -depth 24 -localhost -nolisten tcp
You can also make a short command for ease of use in the "/usr/local/bin" directory:
sudo nano /usr/local/bin/startVNC-local
The contents of the file should be:
#!/bin/bash
vncserver :14 -geometry 1900x950 -depth 24 -localhost -nolisten tcp
Make this file executable:
sudo chmod +x /usr/local/bin/startVNC-local
Now to start the RealVNC server to listen to the local machine (127.0.0.1) you just type in the SSH session window:
startVNC-local
- Next you set up Putty on Windows to establish the tunnel when SSH session is started. You make the follwing settings in Putty:
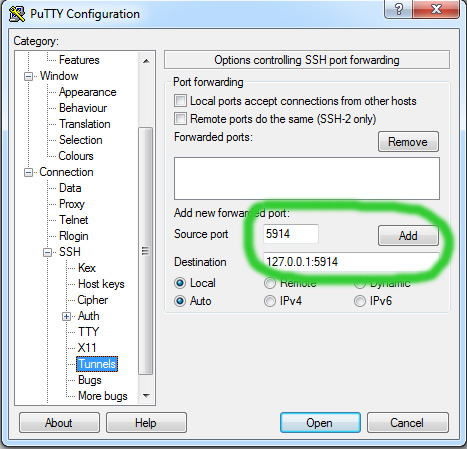

Give a name to your SSH connection and save it for easy access later:

- Finally, after you start the SSH session with tunnel (using Putty), you start the RealVNC server (using the command startVNC-local in the session window), just once if you have rebooted and the server is not already running, and connect the Turno VNC viewer with this setting:
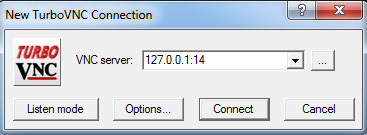
You have successfully established the VNC connection in a tunnel on SSH session.
4. Install UFW (Uncomplicated Firewall) and set up UFW rules;
The most used and easy to use firewall is UFW (Uncomplicated FireWall). Here is one of the many guides that exist >> UFW Debian Wiki.
Here is how we setup on the Pi with the LOC staking wallet:
- Before you enable the UFW you should set a rule that will exclude you local IP address from being blocked by the firewall. Otherwise, in case you access the Pi remotely, you will get blocked out by the firewall. Here is the rule to set up:
sudo ufw allow from 192.168.100.103
where 192.168.100.103 is your local IP address on your Windows (remote) machine.
- Set a rule to allow the listening port of the LOC staking wallet:
sudo ufw allow 1335/tcp
- Check the status:
sudo ufw status verbose
- Delete a rule:
sudo ufw delete x (where x is the consequential number of the rule to be deleted)
- Disable the firewall:
sudo ufw disable
- Enable the firewall:
sudo ufw enable
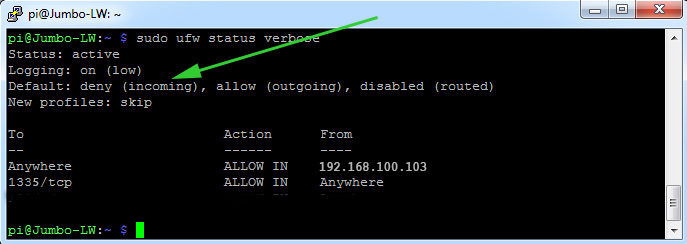
Here is what you should have after all rules are in place and the UFW is enabled. Pay attention all incoming ports are closed by default:
5. Set up port 1335 for the wallet on the router;
In the step above we have opened port 1335 on the UFW on the Pi, now we need to open the same port on your router and forward to the Pi. On my router it's under Security > Apps and Gaming > Single port forwardig (see the image below).
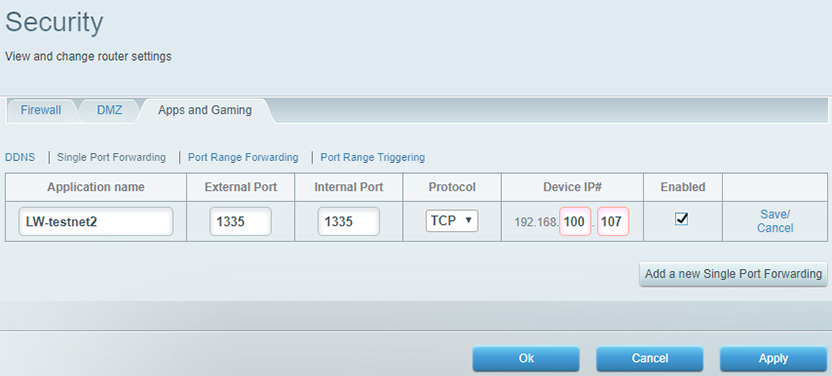
On every router it's slightly different, so you would need to check in the manual of your router "How to setup port forwarding". External port is the open port on the router listening to the internet, Internal port is the open port on the Pi, TCP is the protocol and Device IP# is the IP of the Pi on your local network.
Now we've arrived at a very important step - checking if all ports are set up correctly.
6. Check for open ports;
- Check listening ports with netstat command:
sudo netstat -nlpt
You should see the following result:
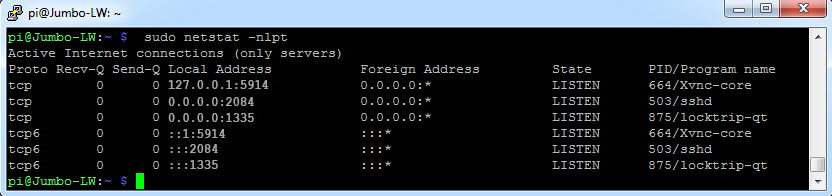
The first open port is 5914 and this is VNC server listening to the local machine for a tunnel. The second open port is 2084 and this is the SSH server listening to the internet for connections. The last open port is 1335 and this is the LOC staking wallet listening for connections. The last three rows show the same ports on IPv6, but they are not listening to anywhere, because we have disabled IPv6.
- Useful third party services to check your open ports:
1. A free program that you can download and check open ports on a specific device in your LAN >> Advanced Port Scanner.
2. A free online service to check single open ports how they are seen from the internet >> YouGetSignal.
7. Set up Google 2FA to protect the SSH session;
What is important to know here is that for Google 2FA to work the time on the Pi and on your Google 2FA app must be synchronized. As the Pi has no real-time clock with quartz stabilization, the time on the Pi will drift significantly if synchronization is not done in certain time intervals (I preferred to be sure and make re-synchronization once per every 24 hours).
How to setup Google 2FA is well described in this previous article for Pi 3b+ (It works exactly the same way on Pi 4b) > How to protect the SSH session with 2FA on Raspberry Pi 3b+.
Hardware used in this article
- - Raspberry Pi 4b;
- - 5V/3A C-type connector power supply;
- - Samsung 970 EVO Plus 250GB NVMe M.2 SSD;
- - X870 NVMe M.2 SSD Storage Expansion Board (Adapter) - JMicron Technology Corp. chip set;
- - Armor case/heat sink for Raspberry Pi 4b;
- - 12V low noise Jiesammy cooling fan, powered from the Pi.

If you find inaccuracies in this article or ways to improve it, please leave a comment below. In the next article we use Ledger Nano S to protect the SSH session to the Raspberry Pi.
Related articles
The Guide to staking HYDRA on Raspberry Pi 4b
The Guide to staking LOCs on Raspberry Pi 4b (Pre-Hydra Testnet)
- Raspberry Pi 4b - basic setup with Raspbian Buster and getting ready to install the LOC staking wallet
- Recompiling and installing of LOC staking wallet with GUI on Raspberry Pi 4b
- Basic security check list for staking LOCs on Raspberry Pi 4 model b
- Using Ledger Nano S to protect the SSH session to the Raspberry Pi 4b with LOC staking wallet
The Guide to staking LOCs on Raspberry Pi 3b+ (Pre-Hydra Testnet)
Yours, Crypto Qu
Ways to support my work, if you find it helpful. Thank You!
Book with LockTrip
![]() Save up to 60% on hotel reservations with Locktrip booking engine!
Save up to 60% on hotel reservations with Locktrip booking engine!
Extra 5% discount for first booking with code Y8XVQ
Go to Locktrip ...
 Scan QR code for LOC wallet address to send donation to
 Comments are helping improve the article quality and are of great value for me!
 Scan QR code for HYDRA wallet address to send donation to
 Scan QR code for BTC wallet address to send donation to
Our clients' websites 'live':
www.cellular-concrete.net www.ionitech.com www.nikol-n.bg www.stroitel-bg.com
Newest projects: www.hydragon.blog