Domain Kiosk
Creative website design and internet marketing studio
How to protect the SSH session with 2FA on Raspberry Pi 3B+
In this third article we continue the series about making secure the Pi for staking LOCs. We will increase the security level of SSH by adding 2FA to the session login.
What do we show you in this article?
- 2FA and how it works.
- Set up the clock properly and make it resynchronize time.
- Install 2FA PAM module.
- Configure your mobile device.
- Configure SSH.
- Test SSH with 2FA in new session.
1. 2FA and how it works
2FA adds another level of security to your login credentials. While your password can be phished, guessed, brute-forced or stolen from the device, the 2FA provides that the login procedure involves something else that only you know, you have or you are.
Here is a good article that explains in more depth what 2FA is >> What is 2FA and how it works.
2. Set up the clock properly and make it resynchronize time
We are going to use Google 2FA, which needs time on the protected device (the Pi) and on your smartphone (where the Google 2FA Authenticator is) to be in perfect sync. Unfortunately the Pi has no real time clock, and each time you boot, the Pi gets time automatically form another NTP server. This is done by a command “timedatectl”, which is run at each booting cycle. Alternative way to sync time is to install a NTP server on the Pi and use it to sync time. Here we will use however the default “timedatectl” service.
A good article, explaining “timedatectl”, can be found here >> Time sync Raspberry Pi.
The “timedatectl” service is run just once at booting the Pi. Then the Pi knows the time and date, but as time passes, a noticeable time drift happens, which means the clock on the Pi can go faster or slower, depending on many conditions: voltage instability, temperature changes, capacitor and resistor tolerances of the clock. For this reason the clock needs to be resynced every now and then.
To force clock resync there is no specific command, so the way to do it is to just restart the “timedatectl” service. This is the command to restart the service and get time back to sync:
sudo systemctl restart systemd-timesyncd.service
For ease of use you can make a shell script in “usr/local/bin” like this
sudo nano /usr/local/bin/timeresync
The file contents should look like this:
#!/bin/bash
systemctl restart systemd-timesyncd.service
Make the file executable:
sudo chmod +x /usr/local/bin/timeresync
You can also make a command to check the status of the resyncing service, you will be able to check when was the clock last resynced and with which server the Pi was connected to get the right time:
systemctl status systemd-timesyncd.service
For ease of use you can make a shell script in “usr/local/bin” like this
sudo nano /usr/local/bin/timestatus
The file contents should look like this:
#!/bin/bash
systemctl status systemd-timesyncd.service
Make the file executable:
sudo chmod +x /usr/local/bin/timestatus
Now you can resync and check the status with
sudo timeresync and timestatus
And to make the final touch it’s a good idea to make a cron job that will run time resynchronization every 24 hours. To make a new cron job is used the command "crontab -e" and to list current cronjobs is used the command "crontab -l". First time you run "crontab -e" it will ask to choose an editor, after that you ad this two lines at the end of the edited file:
4 9 * * * sudo timeresync
5 9 * * * sudo systemctl daemon-reload
After you reboot, the time on your Pi will be automatically resynced every day at 9:04 am, and the systemctl daemon will be reloaded a minute later, to clear the usual warning message: "Warning: systemd-timesyncd.service changed on disk. Run 'systemctl daemon-reload' to reload units". We can proceed to the next step and install 2FA for the SSH session with the Pi.
3. Install 2FA PAM module
The Google Authenticator project provides a PAM module than can be integrated with your Linux server or desktop. This PAM module is designed for home and other small environments. There is no central management of keys, and the configuration is saved in each users home folder.
On Raspbian you can install it simply with:
sudo apt install libpam-google-authenticator
Open a shell for a user you want to enable two-factor authentication for and run ‘google-authenticator’ to configure:
google-authenticator
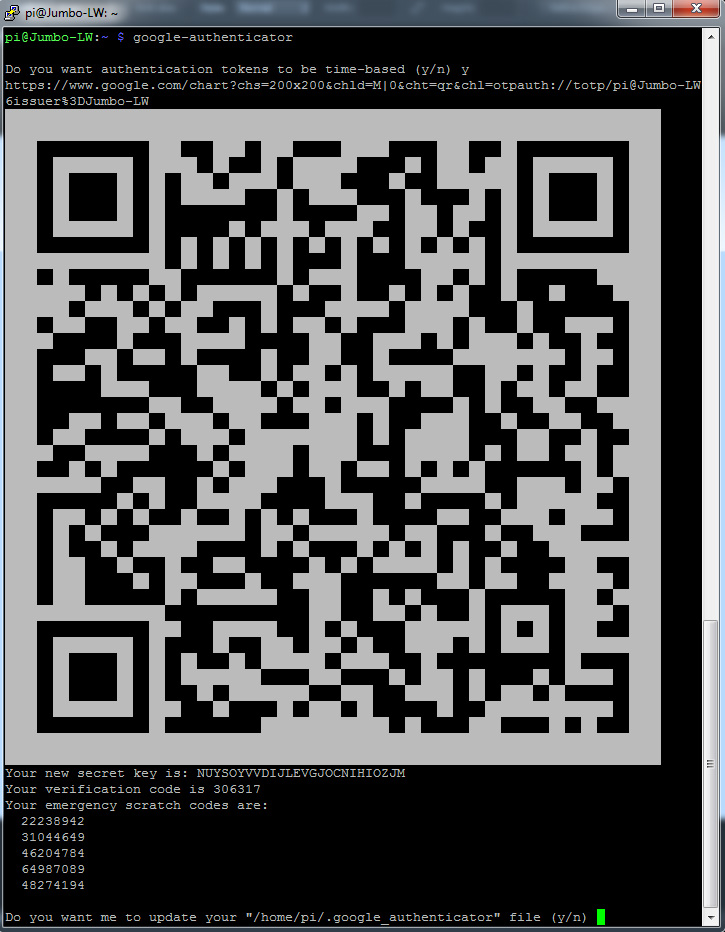
At this point you should write down all codes that are created, including the secret key, the verification code and the emergency scratch codes (see the image above).
WARNING: Never make a snapshot (photo image) of this code and the secret keys on your smartphone. You should keep this information as secure as possible to avoid your 2FA is compromised (hacked). Even then your secret key for 2FA is kept in a folder of the Google Authenticator app on your phone. For max security we would recommend to use an old smartphone exclusively for 2FA, that should never go online.
Now you can answer the configuration questions that follow the codes:
Do you want me to update your "/home/pi/.google_authenticator" file (y/n) y
Do you want to disallow multiple uses of the same authentication
token? This restricts you to one login about every 30s, but it increases
your chances to notice or even prevent man-in-the-middle attacks (y/n) y
By default, tokens are good for 30 seconds. In order to compensate for
possible time-skew between the client and the server, we allow an extra
token before and after the current time. If you experience problems with
poor time synchronization, you can increase the window from its default
size of +-1min (window size of 3) to about +-4min (window size of
17 acceptable tokens).
Do you want to do so? (y/n) n
If the computer that you are logging into isn't hardened against brute-force
login attempts, you can enable rate-limiting for the authentication module.
By default, this limits attackers to no more than 3 login attempts every 30s.
Do you want to enable rate-limiting (y/n) y
4. Configure your mobile device
Install the ‘Google Authenticator’ app and just scan the QR-code. It will automatically configure itself and start displaying verification codes. Alternatively you can manually add the secret key to the Google Authenticator App. You should notice it’ll display new codes each 30 seconds.
5. Configure SSH
Two files need to be edited in order to enable two-factor authentication in SSH.
sudo nano /etc/pam.d/sshd
Add the following line
auth required pam_google_authenticator.so nullok
below this line
@include common-auth
The ‘nullok’ option, by the way, tells PAM whenever no config for 2-factor authentication is found, it should just ignore it. If you want SSH logins to fail, when no two-factor authentication is configured, you can delete the option. Be warned to at least configure it for one user, or you will be locked out of your server.
Now tell SSH to ask for the verification code:
sudo nano /etc/ssh/sshd_config
Edit the setting, it’s probably set to ‘no’:
ChallengeResponseAuthentication yes
6. Test SSH with 2FA in new session
Restart the SSH service with
sudo /etc/init.d/ssh restart
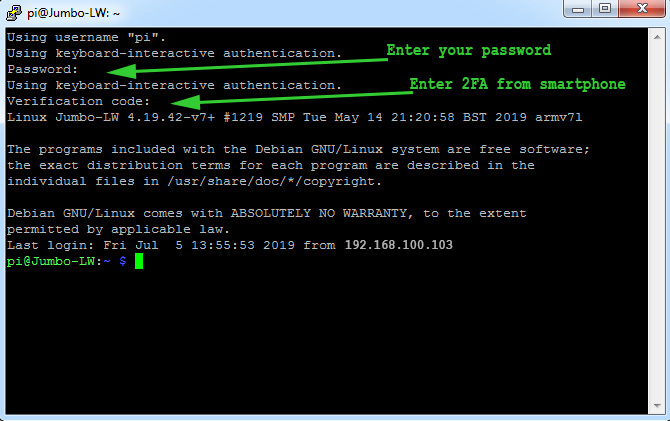
Keep a spare SSH session logged-in, just in case, and open a new one. SSH will now ask for a verification code when you do an interactive login. When a certificate is used, no verification code is asked.
In case you lose your smartphone and need to bypass 2FA, the easiest way is to connect the Pi directly to a monitor and a keyboard/mouse and work from there to turn off 2FA or to remove the Google Authenticator PAM module and the corresponding settings.
You can also setup a single IP address from your LAN in the module configuration, and when connecting remotely from that address on your LAN the 2FA will be bypassed.
Related articles
The Guide to staking HYDRA on Raspberry Pi 4b
The Guide to staking LOCs on Raspberry Pi 4b (Pre-Hydra Testnet)
- Raspberry Pi 4b - basic setup with Raspbian Buster and getting ready to install the LOC staking wallet
- Recompiling and installing of LOC staking wallet with GUI on Raspberry Pi 4b
- Basic security check list for staking LOCs on Raspberry Pi 4 model b
- Using Ledger Nano S to protect the SSH session to the Raspberry Pi 4b with LOC staking wallet
The Guide to staking LOCs on Raspberry Pi 3b+ (Pre-Hydra Testnet)
Yours, Crypto Qu
Ways to support my work, if you find it helpful. Thank You!
Book with LockTrip
![]() Save up to 60% on hotel reservations with Locktrip booking engine!
Save up to 60% on hotel reservations with Locktrip booking engine!
Extra 5% discount for first booking with code Y8XVQ
Go to Locktrip ...
 Scan QR code for LOC wallet address to send donation to
 Comments are helping improve the article quality and are of great value for me!
 Scan QR code for HYDRA wallet address to send donation to
 Scan QR code for BTC wallet address to send donation to
Our clients' websites 'live':
www.cellular-concrete.net www.ionitech.com www.nikol-n.bg www.stroitel-bg.com
Newest projects: www.hydragon.blog